Crew Office Responsibilities
This topic provides guidance on the following AWP and other contract administrative tasks:
- AWP Contract Administration Component Updates
- Adding AWP Contract Authority to Users
- Adding AWP Subcontractors
- Adding AWP Time Suspensions and Resumptions
- Managing AWP Stockpiles
- General Crew Office Tasks
- Managing Ton Item Documentation
- Aggregate and Roadbed Modification Items
- Plantmix and Recycled Surface Items
- Liquid and Emulsified Asphalt Items
- Material Certifications and AWP Sample Records
- Daily Diaries
- Daily Work Reports (DWR)
AWP Contract Administration Component Updates
- Update the AWP Contract Administration, Contract Authority records when appropriate using the table below for the AWP Roles required for specific user access. Refer to the Contract Authority Tab topic in the AWP Construction User Guide for details.
- Add AWP Subcontractors as approved Subcontractor/Service Provider Requests (SSPRs) are received via DocuSign emails. Refer to the Adding Subcontractors topic in the AWP Construction User Guide for details. If the Subcontractor is not in AWP, please email the SSPR to Contract Services with a request to have the Subcontractor added.
- Add AWP Contract Time Suspension/Resumption records as appropriate. Refer to the Suspend/Resume Events Tab section in the AWP Construction User Guide - Contract Setup topic for details. The Suspension and Resumption memos must be attached to these records in AWP. When a current suspension is extended (changed), attach the new suspension letter to the original record and change the date(s) if appropriate (do not create a new record).
| User | AWP Role(s) |
|---|---|
| Crew Mobile Inspector users (e.g., Inspectors, Sup 1, ARE) | MobileInspector |
| Inspector (on loan from another crew) | MobileInspector, NV Inspector, NV Materials Inspector* (if applicable) |
| Tester (on loan from another crew) | NV Materials Tester* |
| Office Manager (on loan from another crew) | NV Crew Office, NV L1 Estimate Generator, NV Materials Reviewer* |
| Consultant Inspector | MobileInspector, NV Inspector, NV Materials Inspector* (if applicable) |
| Consultant Tester | NV Materials Tester* |
| Consultant Office Person | NV Crew Office, NV L1 Estimate Generator, NV Materials Reviewer* |
| Consultant Assistant RE | NV Crew Office, NV L1 Estimate Generator, NV L2 Estimate Review, NV L3 Estimate Approve, NV Materials Authorizer* |
| *IMPORTANT: Send an email to Terry Fitch - tfitch@dot.nv.gov and Cc Kristen McDaniel - kmcdaniel2@dot.nv.gov indicating the user requires access to the crew's field lab. | |
Managing AWP Stockpiles
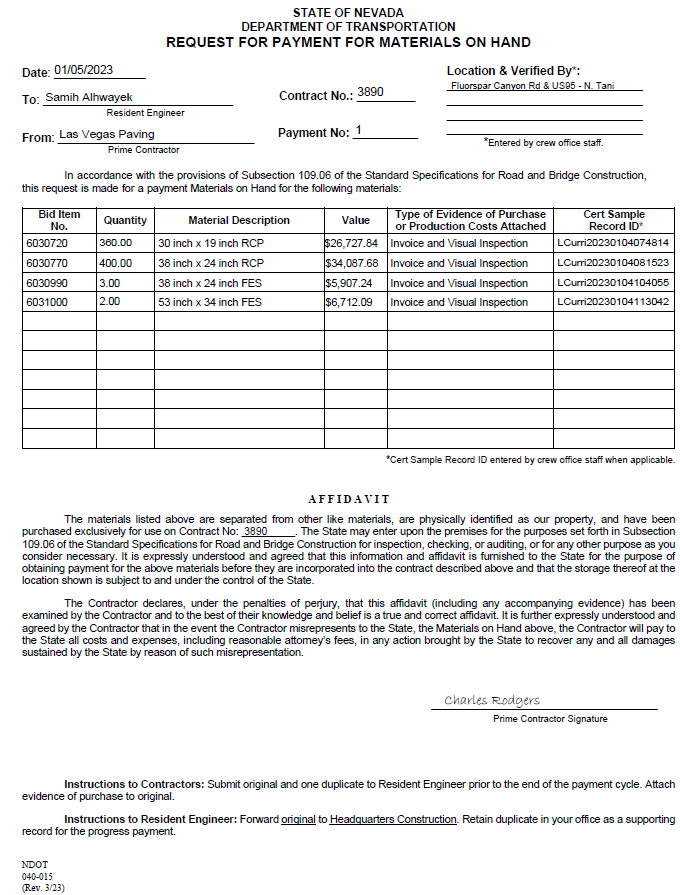
Stockpile partial payments may be made for acceptable materials furnished and stored for use on a contract if such storage is within the vicinity of the job site in the State of Nevada and subject to or under the control of NDOT. This is more commonly referred to as payment for Materials On Hand. Refer to the Standard Specifications, Subsection 109.06, (Measurement and Payment) Partial Payment, for details.
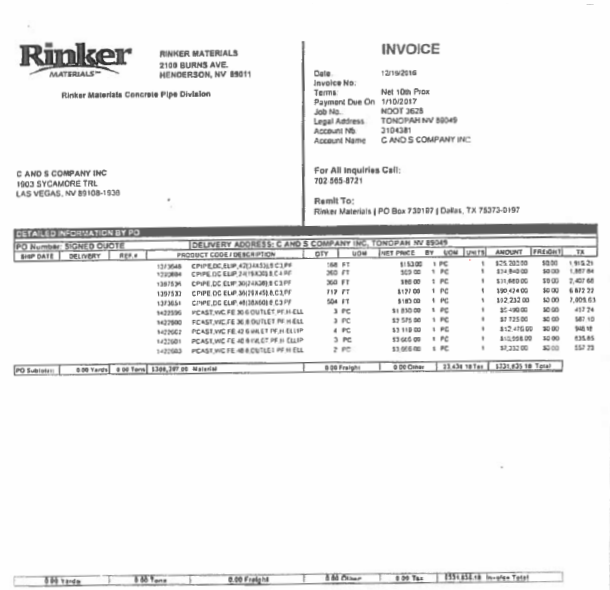
- The Prime Contractor must submit a signed "040-015 Request for Payment for Materials On Hand" form, an invoice, material certification(s), all test reports, including RAP test reports if applicable, and approved mix design or Contractor’s proposed mix design (if applicable) to request a stockpile partial payment. Any subsequent additions to the stockpile must be requested by submitting a new signed form and additional invoices. The form is located on the NDOT external website in the NDOT Construction Forms page.
- Partial payments for materials fabricated or manufactured off the job site (pipe, rebar, fence, etc.) shall be allowed at invoice prices, providing the invoice costs are less than unit bid price for each item.
- Sales tax and freight charges may be included in the adjusted unit price if it is requested and substantiated by an invoice.
- The stockpiled price for reinforcing steel and all guardrail items (guardrail, end anchors, connections, etc.) cannot be greater than 50% of the bid price for the bid item.
- Payments for reinforcing steel for drilled shafts should not be greater than 50% of the unit bid price. If unusually high or low bid prices for these items are encountered, contact Construction Administrative Services staff on a case-by-case basis.
- Partial payments are not allowed for any perishable items unless allowed in the Special Provisions. This is especially important on the contracts which include planting or beautification items.
- Any stockpile request submitted will need Contractor informational testing verification from the Construction QA/IA Section. The Construction QA/IA Section staff have 14 calendar days to approve or reject the request.
- If a stockpile payment is requested before the materials are delivered to the job site, provide a detailed explanation of the storage location and, if known, the shipment date on the "040‑015 Request for Payment for Materials On Hand" form.
- Assign an NDOT representative to verify quantity, quality, location, proper storage, acceptability of the material, and the information furnished with the Contractor's request.
- Determine a percentage of the unit bid price to be paid for the stockpile item if the unit price on the invoice exceeds the unit bid price for any item.
- Determine if materials included for payment have been incorporated in the work. Material incorporated into the work needs to be reduced from the stockpile unless there is enough in the item to cover the stockpile.
- Save the Material Certification(s) and test report(s) to the appropriate contract files directory: Contract Files\Contract\08 Scale Weights & Certs or Contract Files\Materials\21 Certs & Test Reports\21.# .
- Create a Cert Sample Record for each Material Certification received prior to creating the Stockpile record. Refer to the Field Testing Guide, Part 4 - AWP User Guides, Cert Sample Record section for details.
- Enter the Cert Sample Record ID(s) in the appropriate location on the Request for Payment for Materials On Hand form (040-015).
- Save the signed Request for Material On Hand form and invoice(s) to the appropriate Contract Files\Contract\07 Estimates\7.# Mat on Hand directory.
- Immediately email the Request for Material On Hand form and invoice to the Construction Admin Section staff for review. They will work with the crews if any changes are necessary.
- Create the stockpile record using the dollar amount information from the invoice. Refer to the Adding a New Stockpile section in the AWP Construction User Guide - Stockpiles topic for details.
- Once a stockpile for an item has been set up, it will pay the entire stockpile amount on the next payment estimate processed. The Stockpile will automatically recover in later Payment Estimate(s) when the associated item has been paid for.
- If additional stockpile requests (with appropriate documentation) are received on an item which already has a stockpile record created, create a replenish record in the original stockpile. DO NOT create a new stockpile record. Doing so will cause issues in the AWP software during the recovery (posting to the item) process. Refer to the Stockpile Replenishment section in the AWP Construction User Guide - Stockpiles topic for details.
Stockpiles - Resident Engineer’s Responsibilities
Stockpiles - Crew Office Responsibilities
Note: The stockpile record must be created and included in a bi-weekly payment estimate before any DWR postings for the stockpile bid items are made. AWP will not allow stockpile payment on bid items to exceed plan quantity.
General Crew Office Tasks
- Ensure all Inspectors can access the crew's SharePoint Contract Files directories and associated files on their iPads. It is recommended Inspectors use the iPad's - Add to Home Screen function to place the contract files directory on the home screen for easy access.
- Save photos and videos in the appropriate Contract Files\Contract\03 Multimedia directory.
- Review item calculation sheets for accuracy and save in the appropriate Contract Files\Contract\07 Estimates\7.# DWR Calc Sheets directory using this naming convention: DWR YYYY-MM-DD Inspectors Initials, (e.g., DWR 2025-03-25 CJH). This includes calculation sheets located in the DWR item postings attachments.
- Save emails containing TBC survey stakeout report/data in the appropriate Contract Files\Contract\09 Survey directory.
- Save all Contractor’s survey stakeout data in the Contract Files\Contract\12 Misc\12.# Stakeout Data directory.
- Review the Foundation Pile Driving Records and Drilled Shaft Inspection Reports for accuracy and save electronically in the appropriate Contract Files\Contract\07 Estimates\7.# Drill Shaft & Piling directory.
- Review the Certified Payroll Reports (CPRs) weekly in LCPtracker and note late or missing payrolls. Crew staff will notify the Prime Contractor in writing via a Late Payroll letter of any offending subcontractor or service provider. If errors are found on the payrolls, crew staff will notify the prime contractor and the correction must be completed immediately. Click here for an example of a Late Payroll letter. Contact Contract Compliance staff for questions on the CPRs in LCPtracker.
- Distribute appropriate documents to Inspectors:
- Engineer's Estimate Report - Agreement Estimate (AEB) (MasterWorks)
- Estimate Quantities by Breakout Report and/or Bid Item Summary Report (MasterWorks)
- 3rd Party Agreements
- Executed change orders
- Letters of Authorization (LOA)
- Job mix formulas (JMFs)
- Contract plans
- Special Provisions
Managing Ton Item Documentation
Note: Contracts using an e-Ticketing solution to track truck deliveries for aggregate and plantmix and recycled surface items will NOT use a "last computerized load ticket" or complete the "Record of Delivery" spreadsheets.
In the current HaulHub e-Ticketing mobile application, Inspectors will add appropriate notes (temperature, stationing, waste, additional notes) to the e-Ticket and "Accept" or "Reject" the truck loads. The application records the quantity (gross, tare, and net) for each load delivered.
The crew office staff will use the web-based HaulHub Delivery Report to track daily totals. This report is used as part of the source documents for payment. Refer to the e-Ticketing topic in this manual.
Aggregate and Roadbed Modification Items
Refer to the Aggregate and Roadbed Modification Items section in the Inspector Guidance, Weight Items topic for details on the Inspector's responsibilities for these items.
- Collect all Bill of Ladings (B/Ls) and material certifications and save them to the appropriate Contract Files\Contract\08 Scale Weights & Certs\8.# directory. See naming conventions in the Material Certifications and AWP Sample Records section below.
- Collect all computerized load tickets from the Inspectors. Only the last ticket is required for documentation.
- Create the associated AWP Cert Sample records. Refer to the Material Certification and AWP Sample Records section below and the Field Testing Guide, Part 4 - AWP User Guides, Cert Sample Record section for details.
Aggregate Items
Record of Delivery – Aggregate Base Spreadsheet
The Record of Delivery – Aggregate Base spreadsheet is used to track the daily material delivered to the job site. The completed daily spreadsheets are used as part of the source documents for payment.
- The Inspector will update the Record of Delivery – Aggregate Base spreadsheet located in the appropriate SharePoint Contract Files\Contract\08 Scale Weights & Certs\8.# directory.
- When the Inspector has completed their updates, verify and update the spreadsheet in the appropriate day tab:
- Entries match the information on the computerized load tickets.
- Beginning and ending stations with line designations and LT, RT, or CL.
- Totals posted to each AEB (category) add up to the total delivered for the day.
- A time is listed every fifth entry. (Optional)
- Waste was recorded.
- The Remarks are appropriate and clear.
- If the Total Tons box on the spreadsheet does not match the total tons on the final computerized load ticket, enter a line through the total tons on the final ticket and record the number from the Total Tons box.
- Enter initials in the 'Checked against scale sheet:' field.
- Show the calculations for moisture deductions, if applicable, in the Remarks.
- Indicate the Dry Aggregate Pay Totals for each AEB (category). These totals will be entered in a DWR item posting in AWP.
- Save the completed spreadsheet to the appropriate Contract Files\Contract\08 Scale Weights & Certs\8.# directory.
- Moisture tests are required per Standard Specifications, Section 304, Portland Cement Treated Base.
- If moisture was not weighed, a note explaining why will be placed on the last computerized load ticket and in the remarks on the Record of Delivery – Aggregate Base spreadsheet relaying this information.
- Moisture deduction calculations are only completed when the Actual Moisture content of aggregate base is plus one percent of the Optimum Moisture.
- If a Compaction Report is not run daily, use a Compaction Report that was completed before the date being processed.
- Moisture deductions apply to both Type A and Type B Aggregate.
- Calculations for moisture deductions are shown in Figure 9-11. The following formulas shall be used to arrive at the daily pay total of aggregate base material when a deduction is necessary.
-
Dry Agg = Total aggregate/[1+ (actual moisture%/100)]
- Dry Agg x [1 + ((optimum % + 1 %) / 100)] = Dry Aggregate Pay Total
- For instance, the daily total for AEB (category) #1 is 133.68 tons. Actual Moisture is 6.4% and optimum moisture is 5.2%. The calculated quantity for payment would be: 125.64 x 1.062 = 133.43 Dry Aggregate Pay Total AEB (category) #1.
- If calculations are needed and there are more than one AEB (category) numbers involved, make sure to adjust for the water in each AEB# as shown in example above.
- If a calculation for water deduction is needed, the total tons WILL NOT match the total tons delivered.
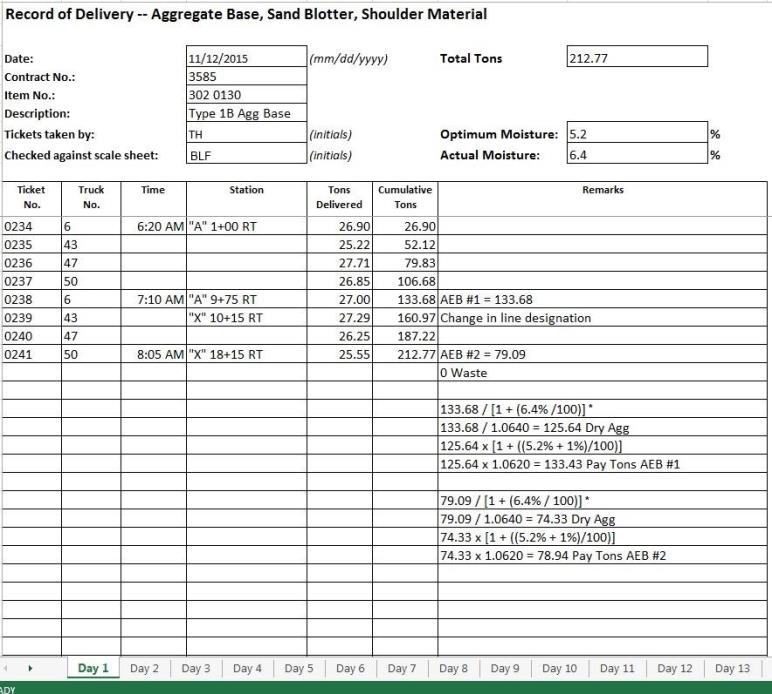
NOTES for Moisture Deduction Calculations:
Last Computerized Load Ticket of the Day (Aggregate Items)
The last computerized load ticket is part of the official contract documentation record for payment.
- Copy the following information from the appropriate day tab in the Record of Delivery – Aggregate Base spreadsheet onto the last computerized load ticket of the day:
- Beginning and Ending stations, making sure all stations are represented and match the spreadsheet.
- Indicate line designation (left, right, or center line).
- AEB (category) number and total tonnage.
- Cumulative total is circled.
- Waste, even if it is zero, is circled in red.
- Have the Resident Engineer sign the ticket.
- Scan and save the ticket to the appropriate Contract Files\Contract\08 Scale Weights & Certs\8.# directory.
Roadbed Mod Items
Record of Delivery and Payment – Portland Cement, Lime (Cold Recycle) Spreadsheet
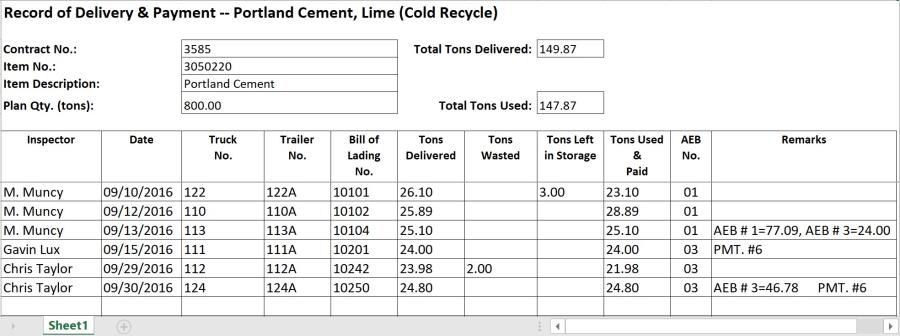
The Record of Delivery and Payment – Portland Cement, Lime (Cold Recycle) spreadsheet is used to track the Bill of Ladings (B/Ls) for daily material delivered to the job site. The spreadsheet is used as part of the source documents for payment.
- The Inspector will update the Record of Delivery and Payment – Portland Cement, Lime (Cold Recycle) spreadsheet located in the appropriate SharePoint Contract Files\Contract\08 Scale Weights & Certs\8.# directory.
- When the Inspector has completed their updates, verify the following:
- Entries match the information on the Bill of Ladings (B/Ls).
- Plan Qty. (tons)
- Waste and storage was recorded.
- Correct AEB (category).
- Enter the total tons used for each AEB (category) and the payment number in the Remarks section.
- Save the completed the Record of Delivery and Payment – Portland Cement, Lime (Cold Recycle) spreadsheet, to the appropriate Contract Files\Contract\08 Scale Weights & Certs\8.# directory.
Plantmix and Recycled Surface Items
Refer to the Plantmix and Recycled Surface Items section in the Inspector Guidance, Weight Items topic for details on the Inspector's responsibilities for these items.
- Save the Mix Design and Job-Mix Formula (JMF) documentation to the appropriate Contract Files\Contract\08 Scale Weights & Certs\8.# directory.
- Distribute the Job Mix Formula documentation to appropriate Inspectors.
- Collect all Bill of Ladings (B/Ls) and material certifications and save them to the appropriate Contract Files\Contract\08 Scale Weights & Certs\8.# directory. See naming conventions in the Material Certifications and AWP Sample Records section below.
- If the marination is being done for more than one contract, make copies of the B/Ls and send them to the other Resident Engineers for the remainder of the project.
- Collect all computerized load tickets from the Inspectors. Only the last ticket is required for documentation.
- Create the associated AWP Cert Sample records. Refer to the Material Certification and AWP Sample Records section below and the Field Testing Guide, Part 4 - AWP User Guides, Cert Sample Record section for details.
Note: Each contract will be listing the same B/Ls. Communicate with the other office personnel and compare what has been used on each contract to assure no B/L is being used more than once.
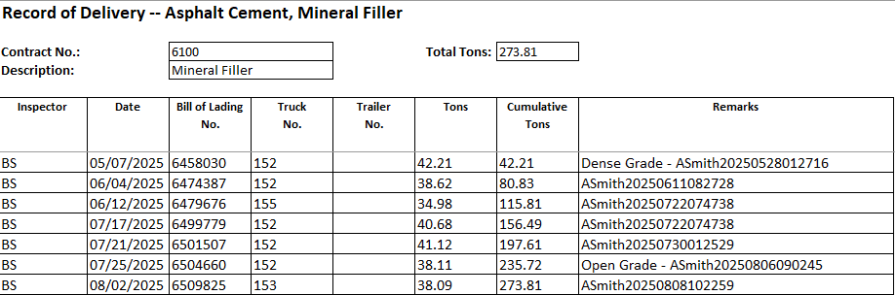
Record of Delivery – Asphalt Cement, Mineral Filler Spreadsheet
The Record of Delivery – Asphalt Cement, Mineral Filler spreadsheet is used to track the material delivered to the job site. A separate spreadsheet is used for each type of material. The spreadsheet is used as part of the source documents for payment.
- The Inspector will update the Record of Delivery – Asphalt Cement, Mineral Filler spreadsheet located in the appropriate SharePoint Contract Files\Contract\08 Scale Weights & Certs\8.# directory.
- Review the entries against the B/Ls.
- Enter the Cert Sample Record ID associated with the specific delivery in the Remarks field.
- Save the updated Record of Delivery –Asphalt Cement, Mineral Filler spreadsheet to the appropriate Contract Files\Contract\08 Scale Weights & Certs\8.# directory.
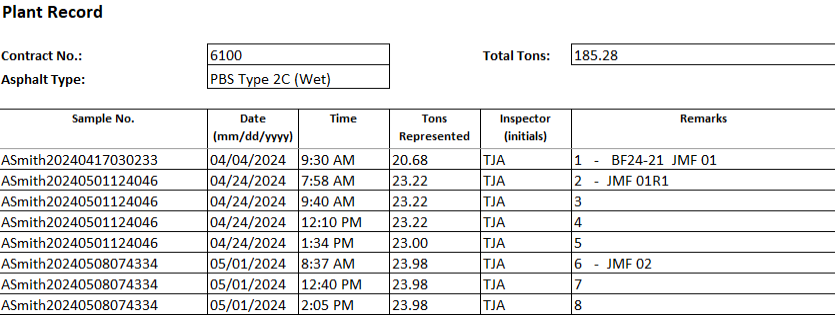
Plant Record Spreadsheet
The Plant Record spreadsheet is used to track the asphalt materials samples taken each day and their associated AWP Cert Sample Records. Refer to the Standard Specifications, Subsection 106.04, (Control of Material) Samples and Tests, for details on the asphalt materials.
- The Inspector will update the Plant Record spreadsheet from the appropriate crew SharePoint Contract Files\Contract\08 Scale Weights & Certs\8.# directory.
- Coordinate with the individual(s) who created the AWP FHQ Sample Records for each sample taken to obtain the Sample Record IDs. Enter the Sample Record IDs into the appropriate Sample No. This is important when calculating liquidated damages.
- Save the updated Plant Record spreadsheet to the appropriate Contract Files\Contract\08 Scale Weights & Certs\8.# directory.
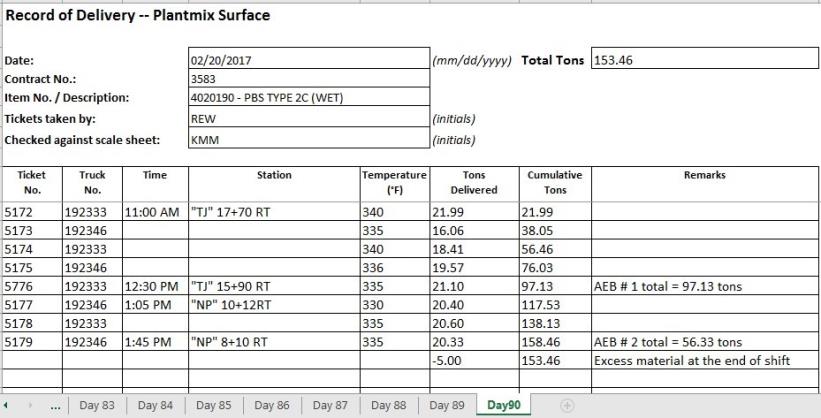
Record of Delivery – Plantmix Surface Spreadsheet
The Record of Delivery – Plantmix Surface spreadsheet is used to track daily material delivered to the job site. The spreadsheet is used as part of the source documents for payment.
- The Inspector will update the Record of Delivery – Plantmix Surface spreadsheet from the appropriate crew SharePoint Contract Files\Contract\08 Scale Weights & Certs\8.# directory.
- Review the entries in the appropriate day tabs against the computerized load tickets. Ensure that all waste is explained in the Remarks.
- Enter the Plant Inspector's waste from the "REPORT OF PLANTMIX QUANTITIES" section on the"040-011 A Daily Plant Inspector" form. Provide an explanation for any waste in the Remarks section.
- Enter initials in the Checked against scale sheet box and save the file.
- Save the completed spreadsheet to the appropriate Contract Files\Contract\08 Scale Weights & Certs\8.# directory.
Last Computerized Load Ticket of the Day (Plantmix and Recycled Surface items)
The last computerized load ticket is part of the official contract documentation record for payment.
- Copy the following information from the appropriate day tab in the Record of Delivery – Plantmix Surface spreadsheet onto the last computerized load ticket of the day:
- Beginning and Ending stations, making sure all stations are represented and match the spreadsheet
- Indicate line designation (left, right or center line)
- AEB (category) number and total tonnage
- Waste from the Hotplant/Marination Inspector and the Street Inspector, even if it is zero, and circle in red
- Have the person checking the information on the ticket initial it.
- Have the Resident Engineer sign the ticket.
- Scan and save the ticket to the appropriate Contract Files\Contract\08 Scale Weights & Certs\8.# directory.
Daily Plant Report of Asphalt Mixtures Forms
The "040-011A Daily Plant Inspector" and the "040-011B Daily Paving Inspector" forms are filled out by the hotplant/marinator and street Inspectors. These forms are attached to their DWRs for review. Refer to the (missing snippet link), 401 - Plantmix Bituminous Pavements: General section for details. They are located in the iNDOT SharePoint NDOT Quality Assurance Forms page. Contact Construction Division Quality Assurance for assistance with these forms.
- The hotplant/marination Inspector will update the "040-011A Daily Plant Inspector" from the appropriate Contract Files\Contract\08 Scale Weights & Certs\8.# directory.
- The street Inspector will update the "040-011B Daily Paving Inspector" from the appropriate Contract Files\Contract\08 Scale Weights & Certs\8.# directory.
- Confirm all the information is correct by viewing the forms in the DWR Attachments.
- Compare the stations on the Daily Paving Inspector form with those on the Record of Delivery – Plantmix spreadsheet.
Note: If the jobmix formula is being used on multiple contracts for different Resident Engineers, copies of the completed Daily Plant Inspector forms must be made and emailed to the other Resident Engineers for the remainder of the contracts. This does not relieve any of the other documentation requirements.
Bill of Lading Calculation Sheet
The Bill of Lading Calculation Sheet can be used to verify if there are enough Bill of Ladings (B/Ls) to cover the quantities placed on the contract based off the mix design (only). The use of this calculation sheet is optional and is not used as supporting documentation for payment. The form is located in the iNDOT SharePoint NDOT Construction Forms page .
- Complete the areas in Blue every two weeks, after the Bill of Ladings (B/Ls) are collected and recorded on the Record of Delivery Asphalt Cement spreadsheet, and the computerized load tickets are collected and recorded on day tabs of the Record of Delivery – Plantmix Surface spreadsheet.
- Save the completed Bill of Lading Calculation Sheet to the appropriate Contract Files\Contract\08 Scale Weights & Certs\8.# directory.
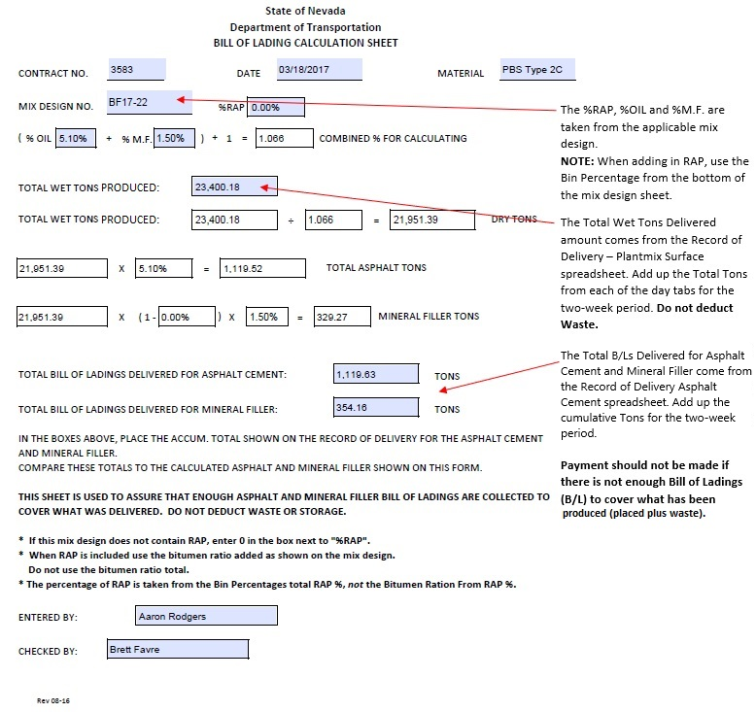
Note: It is the responsibility of the Resident Engineer to work with the Contractor to have extra and/or missing B/Ls submitted. These B/Ls must be entered into the Record of Delivery Asphalt Cement spreadsheet.
Liquid and Emulsified Asphalt Items
Refer to the Liquid and Emulsified Asphalt Items section in the Inspector Guidance, Weight Items topic for details on the Inspector's responsibilities for these items.
- Collect all Bill of Ladings (B/Ls), water tickets or weigh-back tickets, and material certifications and save them to the appropriate Contract Files\Contract\08 Scale Weights & Certs\8.# directory. See naming conventions in the Material Certifications and AWP Sample Records section below.
- Create the associated AWP Cert Sample records. Refer to the Material Certification and AWP Sample Records section below and the Field Testing Guide, Part 4 - AWP User Guides, Cert Sample Record section for details.
Important: If SS-1h is delivered diluted to the job site and the Bill of Lading (B/L) does not show weight of raw asphalt separately from the water added or state the mix percent, the Resident Engineer will inform the Contractor that it is unacceptable, and any application will be done without payment. The Inspector is responsible for documenting (on the B/L) the weight of raw asphalt separately from the water added.
Important: If the entire truck was not sprayed out and the Contractor does not provide a weigh back ticket, or a working gallon meter reading, liquidated damages will be assessed per Subsection 109.2, (Measurement and Payment) Scope of Payment, in the Special Provisions.
Record of Delivery—Liquid/Emulsified Asphalt Spreadsheet
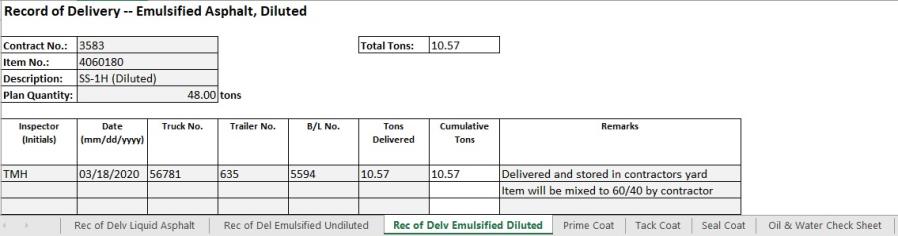
The Record of Delivery – Liquid Asphalt and Emulsified Asphalt (Diluted/Undiluted) spreadsheet is used to track the asphalt delivered to the job site. Separate spreadsheets will be provided for liquid asphalts and emulsified asphalts (diluted/undiluted). The spreadsheets are used as part of the source documents for payment.
- The Inspector will update the Record of Delivery—Liquid/Emulsified Asphalt (Diluted/Undiluted) spreadsheet from the appropriate crew SharePoint Contract Files\Contract\08 Scale Weights & Certs\8.# directory.
- Verify the following:
- Each B/L has a contract number that corresponds to the spreadsheet.
- The weight calculations have been checked and initialed.
- There are enough B/Ls to cover what has been applied.
- Save the completed spreadsheet(s) to the appropriate Contract Files\Contract\08 Scale Weights & Certs\8.# directory.
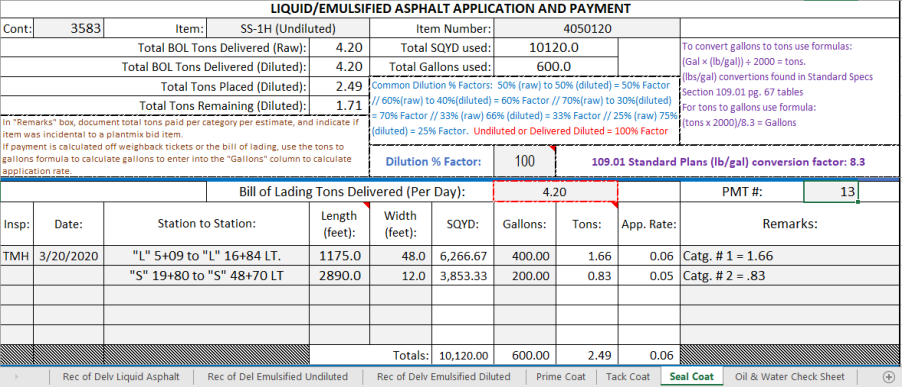
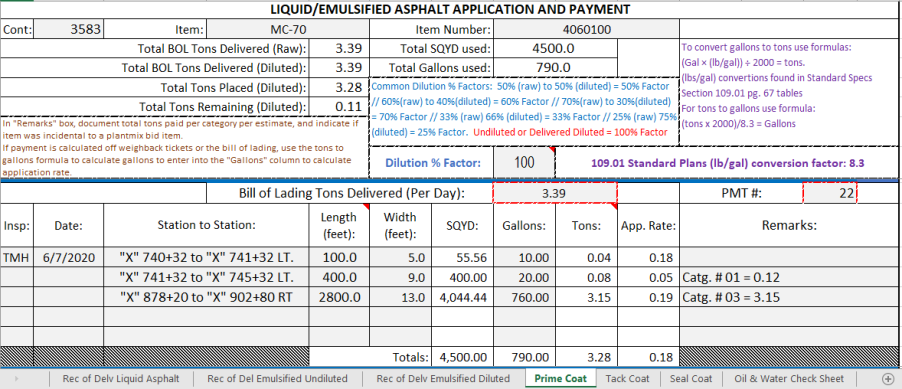
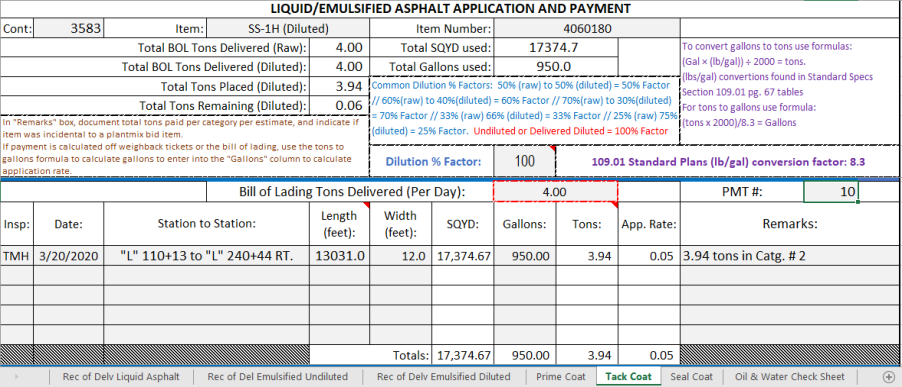
Liquid/Emulsified Asphalt Application and Payment Spreadsheet
The Liquid/Emulsified Asphalt Application and Payment spreadsheet is used to track asphalt applications, payments, and oil/water ratios. Each Liquid/Emulsified Asphalt bid item will be documented on a separate spreadsheet. The spreadsheet is used as part of the source documents for payment.
- The Inspector will update the Liquid/Emulsified Asphalt Application and Payment spreadsheet from the appropriate crew SharePoint Contract Files\Contract\08 Scale Weights & Certs\8.# directory.
- Verify the following:
- Calculations are correct.
- All stationing has a line designation and LT, RT, or CL.
- The application rate is within tolerance.
- There are enough Bill of Ladings (B/L) to cover the tonnage of material being paid.
- Add the Payment Number.
- Save the completed spreadsheet(s) to the appropriate Contract Files\Contract\08 Scale Weights & Certs\8.# directory.
Material Certifications and AWP Sample Records
The AWP software automatically withholds payment on items with deficient and/or missing material certifications. This automatic process uses a Material Certification Sample where the crew office creates a Cert Sample Record and attaches a copy of the material certification and other related supporting documents (e.g., Mix Design, Certification of Compliance - COMO, Bill of Lading - BL, or Submittal). This Cert Sample Record is reviewed and approved by the Material Division, Lab Services (Carson City) staff. Refer to the Field Testing Guide, Part 4 - AWP User Guides, Cert Sample Record section for details.
- Collect all material certifications and supporting documents and save them to the appropriate Contract Files directory. Each Material Certification must have the contract ID, bid item and represented quantity entered. Hand-written entries are acceptable for the contract ID, bid item and quantity.
- Ton items tracked using a Record of Delivery spreadsheet or a HaulHub Daily Delivery Report (e.g., Aggregate Base, Portland Cement/Lime, Plantmix, Emulsified/Liquid Asphalt) will have certifications and related documents (e.g., bill of ladings, scanned last ticket of day, HaulHub Daily Delivery Report, Plant Record and Record of Delivery spreadsheets) saved ONLY in the appropriate Contract Files\Contract\08 Scale Weights & Certs\8.# directory.
- All other material certifications and supporting documentation will be saved in the appropriate Contract Files\Materials\21 Certs & Test Reports\21.# directory.
- Name the certificate file(s) with the contract ID, Material Code Name & description, and CERT. Also include load number, heat number, BL, COMO, or Submittal (if applicable).
- 04525 M2110001 Erosion control - CERT.pdf
- 04521 M5050100 Reinforcing Steel BL 49025OU and CERT.pdf
- 04529 M7030304B CSS-1H BL 14789 and CERT.pdf
- 03954 M7010101A Portland Cement Type I COMO and CERT.pdf
- 04505 M5090001 Drilled Shaft Submittals - Cert & Submittal.pdf
Material Certification File Name Examples
Note: The Material Code Name and description is found in the NDOT Power BI, AWP Reports, Certification Tracking report.
Daily Diaries
A Daily Diary is used to document pertinent daily contract activities and to assess working days for contracts which have an Available Time (Working Day) Main Site Time. It also can incorporate information from Approved DWRs from Inspectors and the Office Manager for the corresponding day.
- The Resident Engineer will create one Daily Diary, per day, per contract, prior to the creation of the Payment Estimate. Refer to the AWP Construction User Guide, Adding a Daily Diary topic for details.
Note: Make sure all Inspector’s DWRs for the corresponding day are Approved prior to creating the Daily Diary.
Note: Daily diaries are still required for the months of December, January, and February if in winter suspension, as defined in the Special Provisions, Subsection 108.02. Enter a zero in the AWP Contract Times, Original Time Charged Field.
Daily Work Reports (DWR)
A Daily Work Report (DWR) is used to document daily site conditions and enter/track quantities of contract items. Once a DWR has been approved, the AWP program uses the item postings contained in the DWR to calculate the Contractor’s payment when creating the estimate.
Refer to the Measurement and Payment Guidelines topic in the manual for details on significant figures and requirements for measurement and payment.
Reviewing Inspector's DWRs
When a Mobile Inspector report is locked by an Inspector, the information is imported into an AWP DWR. Refer to the Reviewing a DWR from Mobile Inspector section in the AWP Construction User Guide - Daily Work Reports (DWR) topic for details.
- Crew office staff will review/verify the following:
- Information in the Remarks (per Resident Engineer and Office Manager direction)
- Information in the Contractor Equipment tab (per Resident Engineer and Office Manager direction)
- Information in the Contractor Personnel tab (per Resident Engineer and Office Manager direction)
- Items are paid correctly according to the contract documents (e.g., plans, supplemental notices, change orders).
- Item quantities
- Quantities in postings are documented to the correct Significant Figure (.01)
- Material Set is correct (if applicable)
- Location information (line designations, offset (RT, LT, or CL), pull box numbers, conduit run numbers, sign numbers)
- Calculations are correct.
- Item posting Comments reference calculation sheets, if applicable.
- Review calculation sheets for accuracy and save electronically in the appropriate Contract Files\Contract\07 Estimates\7.# Calc Sheets directory using this naming convention: DWR YYYY-MM-DD Inspectors Initials, (e.g. DWR 2025-03-19 CJH).
- Approve the DWR if everything is correct.
- If there are edits required in a DWR being reviewed, there are three options to complete the edits:
- Set the DWR to the Draft status. Refer to the Changing a DWR to Rejected or Draft Status section in the AWP Construction User Guide - Daily Work Reports (DWR) topic for details.
- Notify Inspector of required edits in AWP.
- Set the DWR to the Rejected status (DO NOT set the DWR to Draft). Refer to the Changing a DWR to Rejected or Draft Status section in the AWP Construction User Guide - Daily Work Reports (DWR) topic for details.
- Notify Inspector of required edits in the Mobile Inspector application.
- A DWR Note will be completed noting the name of the person completing the edit, the date, and complete details of the edit. See below for additional details on correcting a DWR which has been included in a payment estimate.
- General Tab: Weather, Temperature, Remarks Type or Remarks
- Equipment Tab and Personnel Tab: Number, Hours or Comments ( Description and Name)
- Postings Tab: Location (Line Designations, Offsets) or Comments
- In the Notes tab for the DWR with the quantity error, provide details on the specific error and the following information from the correcting DWR:
- DWR Date
- Name of creator of correcting DWR
- Item number, Description, and incorrect quantity
- Location information
- The details of the correction applied.
- In the Posting comments for the correcting DWR, reference the following information from the DWR where the error occurred:
- DWR Date
- Inspector
- Item Number and Description
- Location
- The details of the quantity error and the correction applied.
Note: If Remarks reference a memo or person, include the date of memo, and the author's full name and title.
Note: Use the NDOT Power BI Report, Item Posting Tracking With DWR Notes - AWP, to aid in tracking item posting quantities. Contact the Construction Admin Services staff for details on this Power BI report.
Note: Length does not always equal the difference between the beginning and ending station. Sometimes there is a curve or an obstacle which will affect the distance. Always check with the Inspector before assuming the calculations are incorrect.
Option 1: Inspector edits the DWR in AWP.
Option 2: Inspector edits the DWR Report in Mobile Inspector
Option 3: Crew Office Staff edits DWR in AWP.
Correcting a Non-Quantity Error in a DWR Included in a Payment Estimate
When a non-quantity error is made in a DWR in the below Tabs/Fields and the DWR has been included in a Payment Estimate, create a DWR Note in the DWR with specific details of the correction for the error.
Correcting a Quantity Error in a DWR Included in a Payment Estimate
When a quantity error (only) is made in a DWR and it has been included in a Payment Estimate, a new DWR must be created to correct the quantity. Use the DWR Notes to cross-reference the DWRs.
Office Manager’s DWRs
Office Manager's DWRs can be completed daily, weekly, or bi-weekly within the two-week pay period. Multiple postings can be added to one DWR. Refer to the Adding a DWR and Approving a DWR sections in the AWP Construction User Guide - Daily Work Reports topic for details.
The Office Manager will create DWR postings for the following:
- Mobilization Lump Sum (L.S.) item
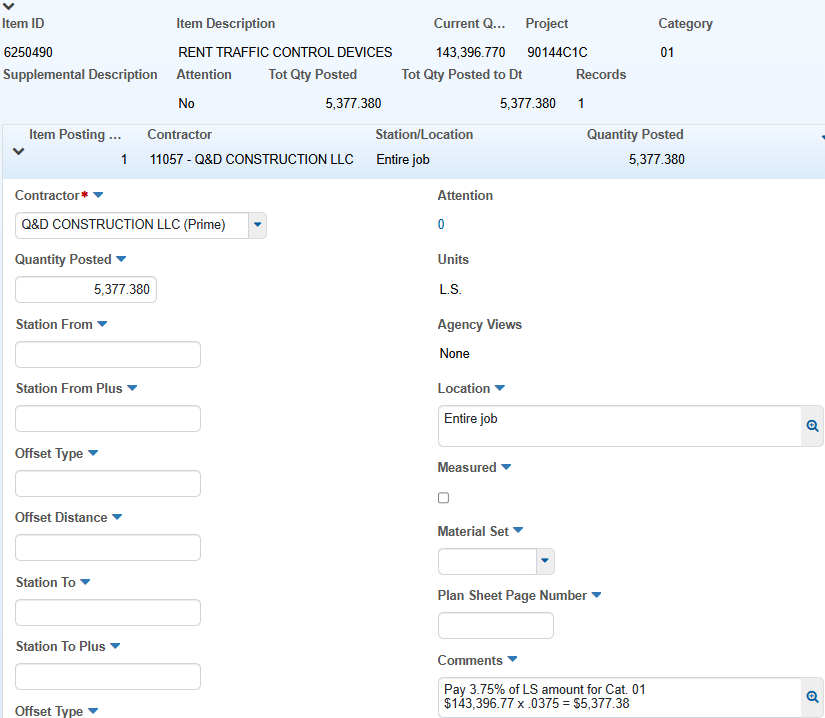
- Percentage (prorated) Lump Sum (L.S.) items (e.g., Rent Traffic Control Devices, Temporary Pollution Control)
- Hour items (e.g., Trainee, Rent Equipment)
- Day items (e.g., Time Related Overhead, Traffic Control Supervisor)
- Month items (e.g., Plant Establishment, Rent Office Space)
- Force Account items paid by an invoice (e.g., Uniformed Traffic Control Officer, Railroad Flagging and Inspection, Partnering)
- Ride Pay Adjustment
- Percent Within Limits (PWL)
- Ton items (e.g., Aggregate Base, Portland Cement, Lime, Plantmix, Liquid/Emulsified Asphalt)
Mobilization (L.S.) Posting Example and Related Notes:
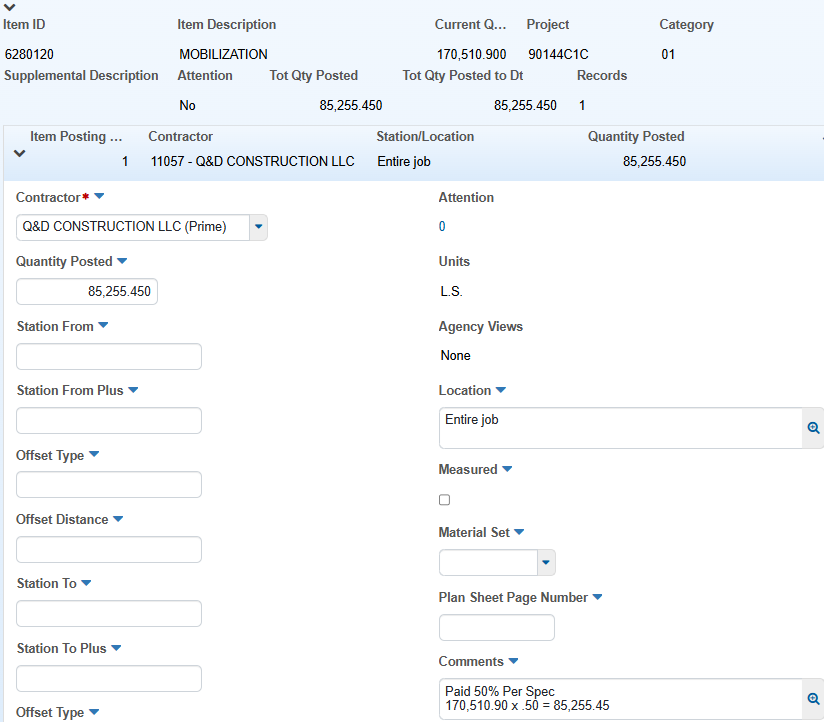
NOTES for Mobilization (LUMP SUM):
- Location: Enter ‘Entire job’ or 'Entire contract'
- Comments: Indicate if the posted quantity is for 50% or 100%, per the Standard Specifications, Subsection 109.06 Partial Payments and show calculation.
Prorated Item (L.S.) Posting Examples and Related Notes:
Rent Traffic Control Devices
Temporary Pollution Control
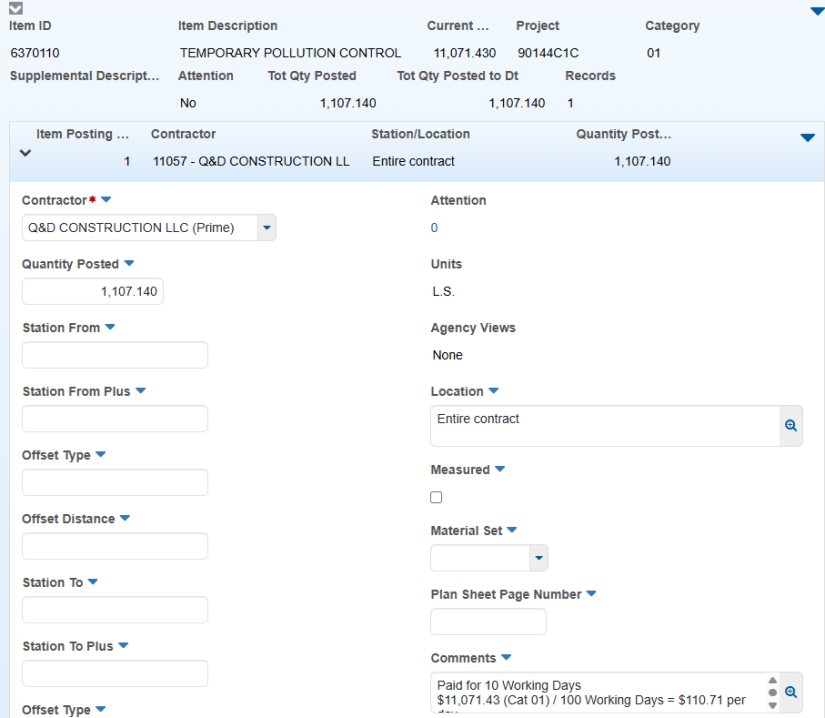
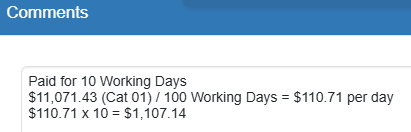
NOTES for Prorated L.S. items:
- Discuss all Percentage item posted quantities with Resident Engineer.
- Location: Enter ‘Entire job’ or 'Entire contract'
- Comments: Indicate percentage and/or days paid and show calculation.
Hour Item Posting Examples and Related Notes:
Training
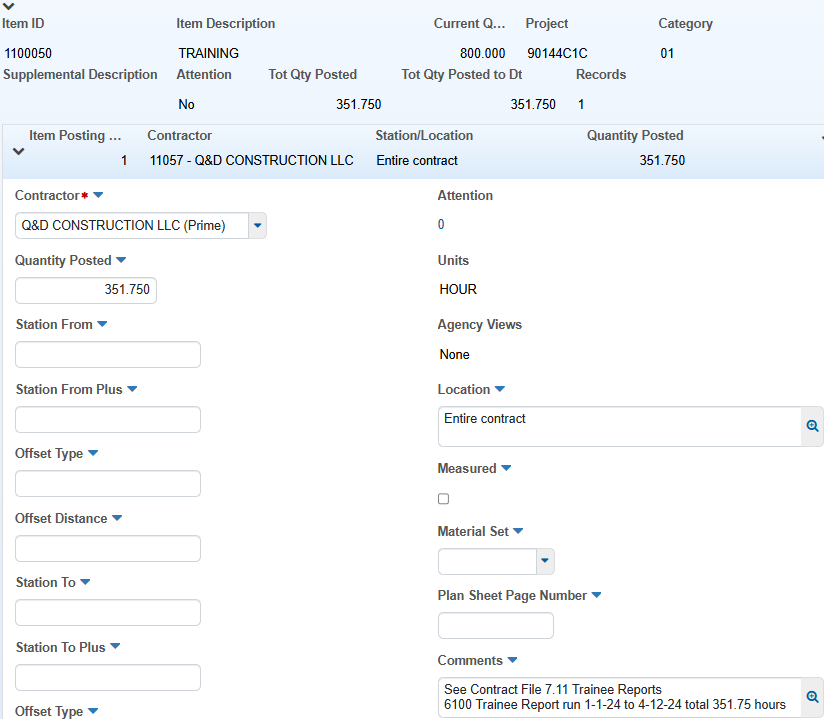
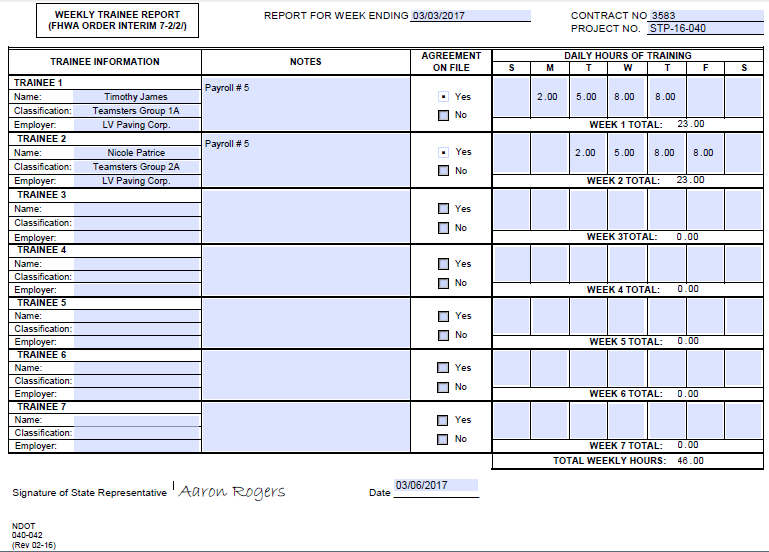
NOTES for Training (Hour) :
- Payment for Trainee is based on hours.
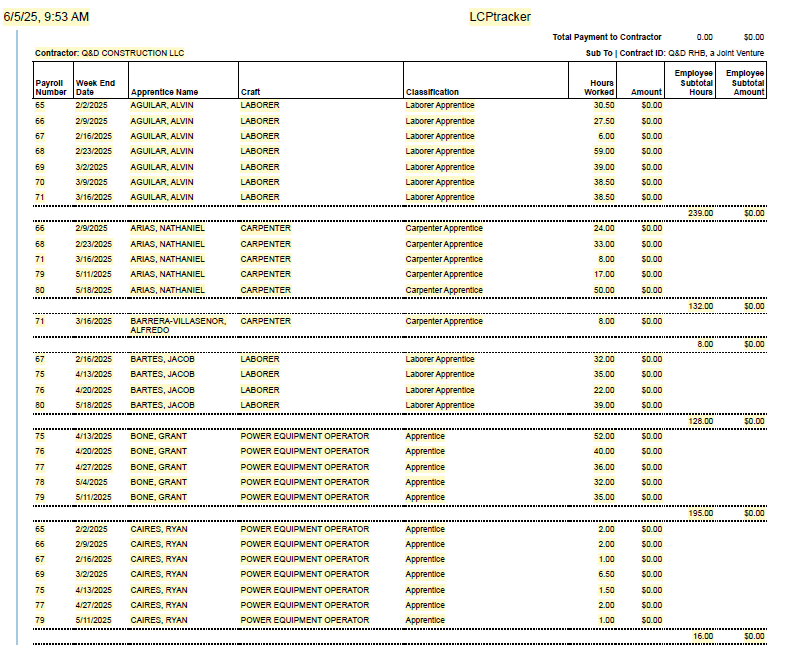
- Trainee hours for apprentices will be documented on an 040-042 Weekly Trainee Report, which will be completed and signed weekly, or on a Training Reimbursement Report printed from LCPtracker.
- Location: Enter ‘Entire job’ or 'Entire contract'
- Comments: Reference the Weekly Trainee Report or the Training Reimbursement Report printed from LCPtracker.
- Reference the Contract Compliance Manual for details on LCPtracker.
Rent Equipment (Loader)
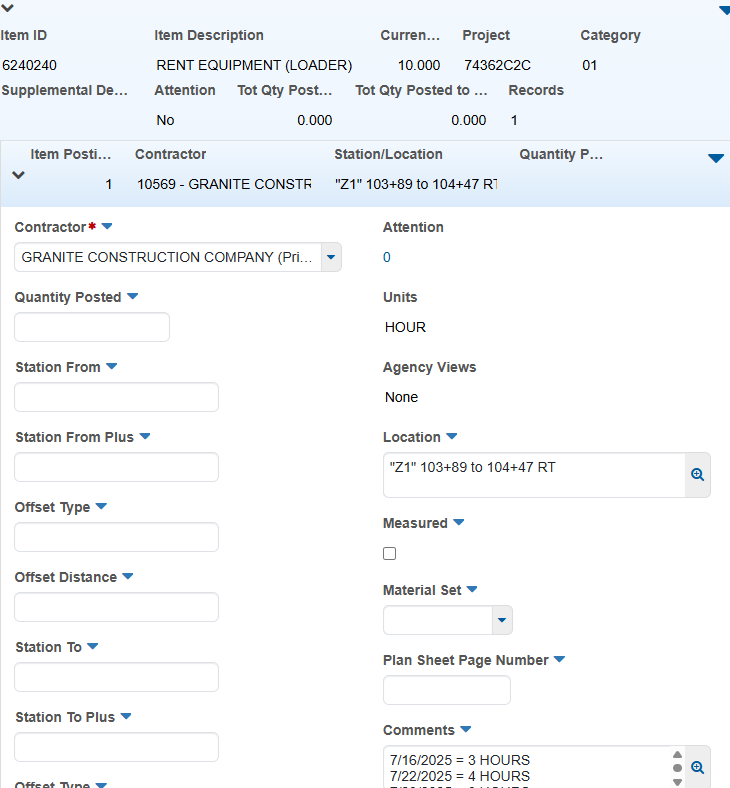
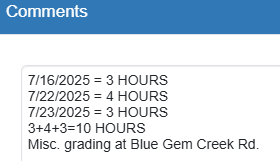
NOTES for Rent Equipment (Hour) :
- Payment for Rent Equipment is based on hours.
- Sig. Fig. is paid to the nearest one-half (.50) hour.
- Location: Refer to contract plans.
- Comments: Indicate date and hours and/or reason equipment was used.
Day Item Posting Examples and Related Notes:
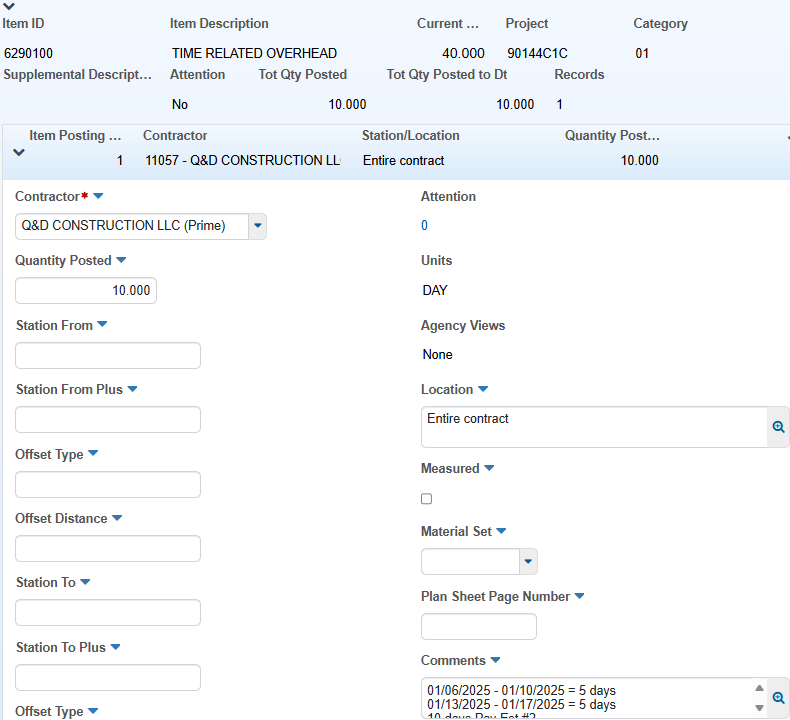
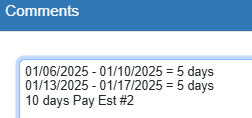
Time Related Overhead
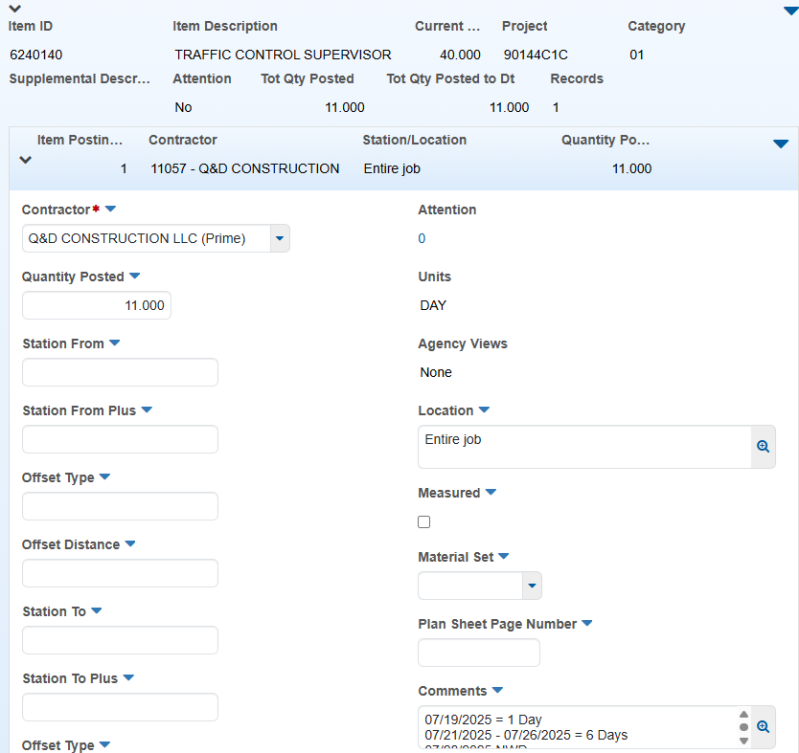
Traffic Control Supervisor
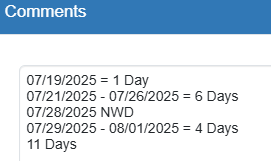
NOTES for Day Items:
- Payments for DAY items are based on Working Days.
- When paying for Biologist, Traffic Control Supervisor, or Time Related Overhead (by the day), it is acceptable to document up to two weeks (coinciding with each payment cycle) on one posting. An explanation is required if a working day is not charged in the two-week cycle.
- Sig. Fig. is paid to the whole number (1.00), unless payment is split between two Category/AEB numbers, then the Sig. Fig. is (0.50) on each Category/AEB to equal a whole number.
- Location: Enter ‘Entire job’ or 'Entire contract'
- Comments: Reference the time frame and any non-working days.
Month Item Posting Examples and Related Notes:
Rent Equipment (Office Space)
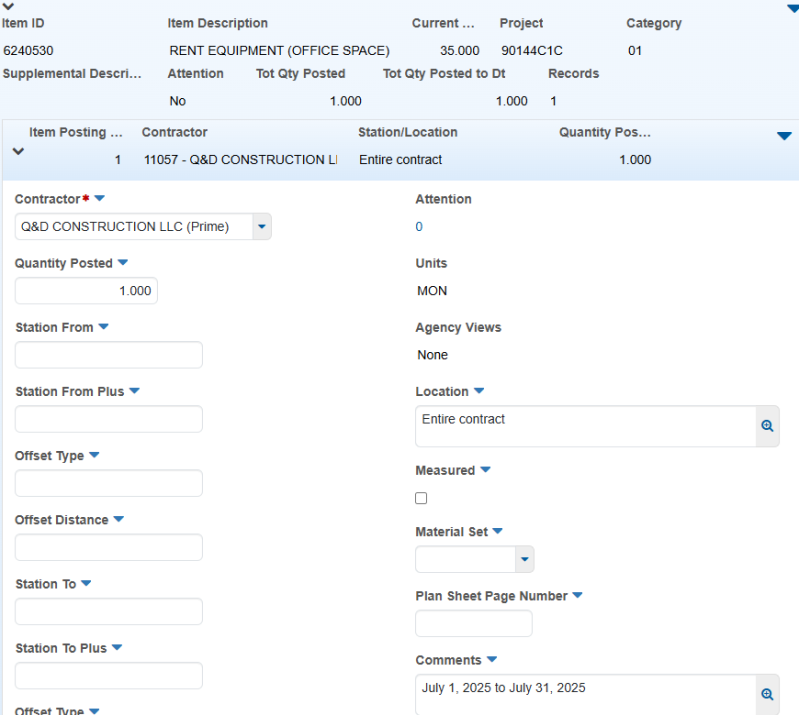
Plant Establishment Work
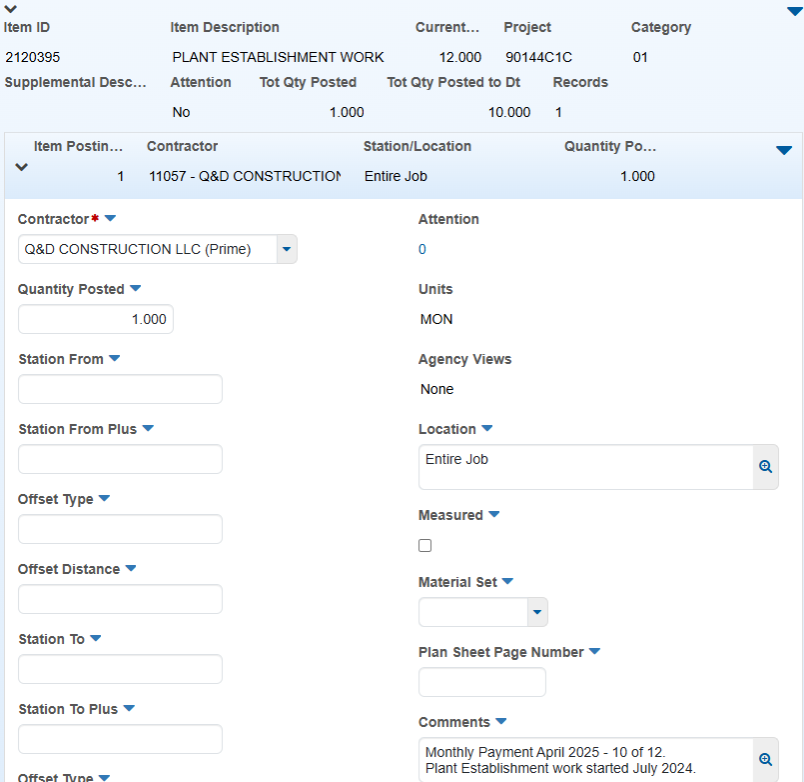
NOTES for month items DWR postings:
- When paying for Plant Establishment or Rent Office Space, the pay quantity for every other pay cycle shall be based on the accumulation of days for the month.
- Complete the 040-046 Monthly Summary of Plant Establishment Activities form each month of Plant Establishment. Save this form to the appropriate Contract/Contract Files/12 Misc directory.
- Sig. Fig. = Increments of (0.50), or to the whole number (1.00)
- Location: Enter 'Entire Job' or 'Entire contract'
- Comments (Rent Office Space): Indicate the beginning and ending dates for the month.
- Comments (Plant Establishment): Indicate the month and year of the start of plant establishment and the month and year of the payment. The number of plant establishment payments can also be included.
Ton Items
Aggregate Base
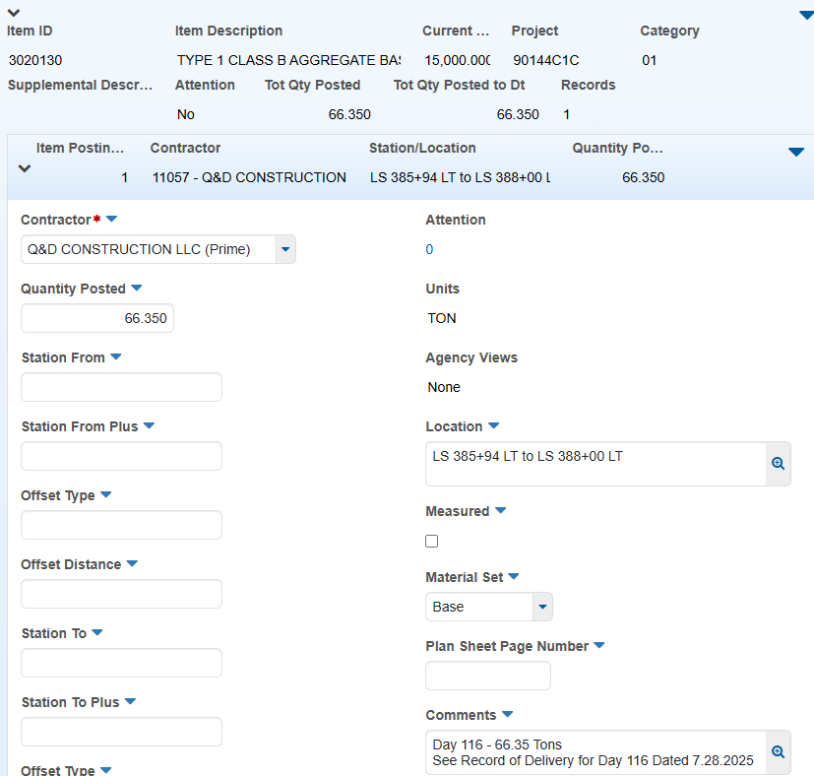
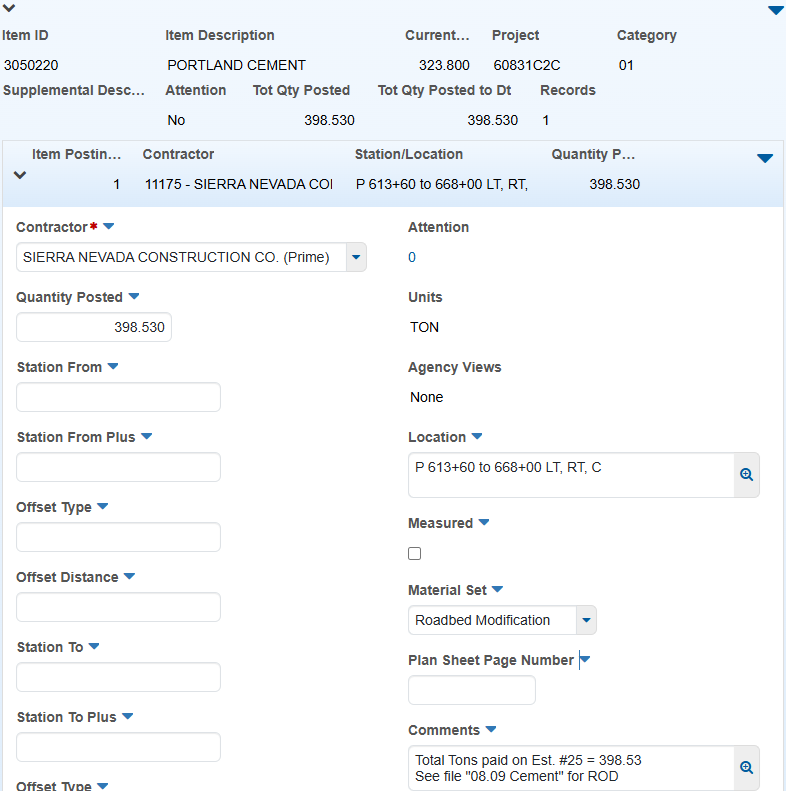
Roadbed Mod - Portland Cement
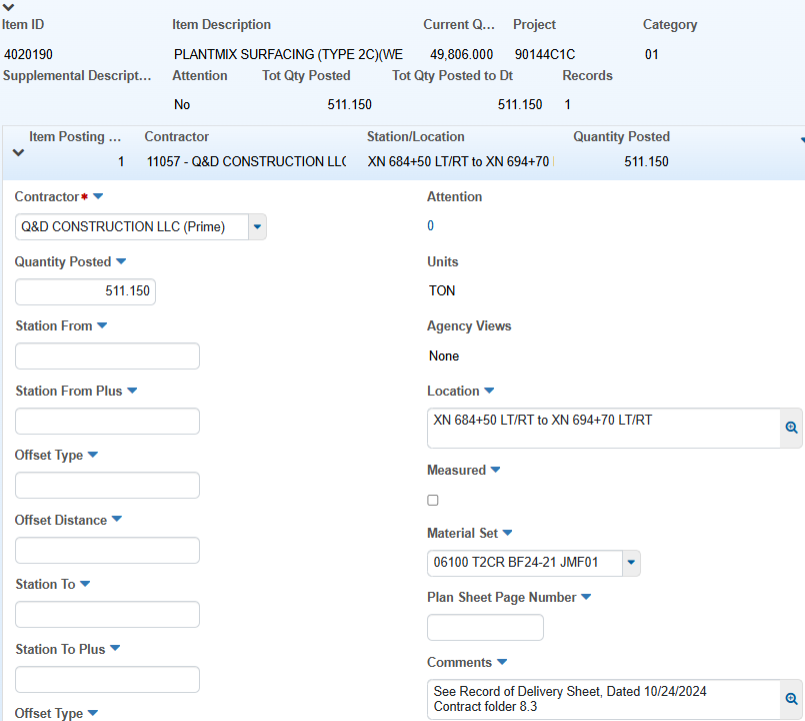
Plantmix Surfacing
Emulsified Asphalt
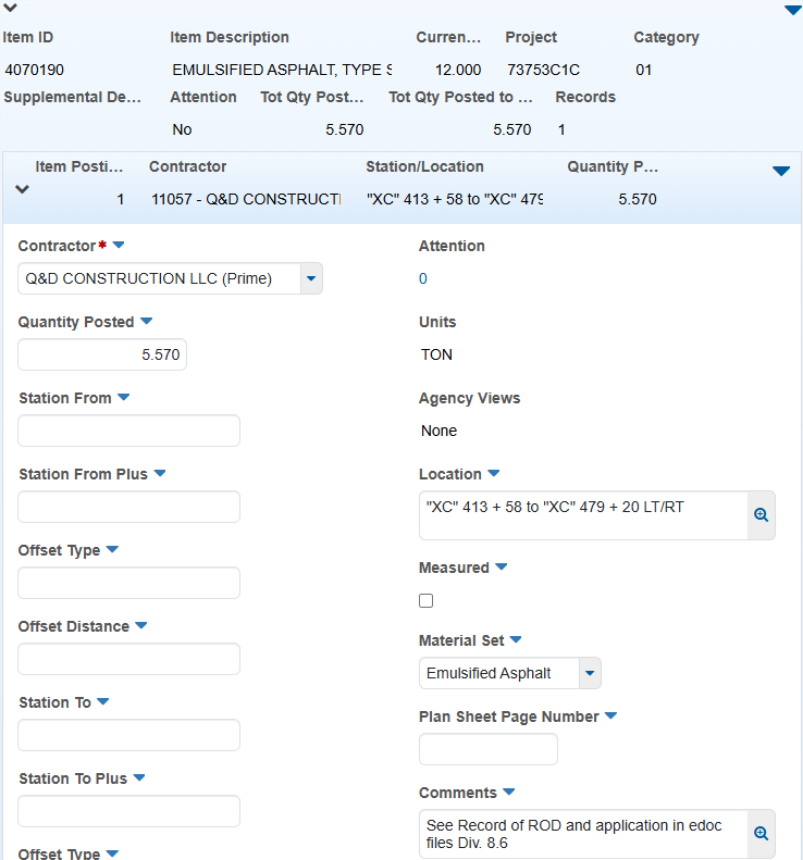
NOTES for TON items:
- Payment for Office Manager Ton item postings are based on values entered in the Record of Delivery and Application spreadsheets.
- Location: Refer to contract plans.
- Material Set: Select appropriate value.
- Comments: Reference Record of Delivery sheets or HaulHub Delivery reports.
Force Account Items Paid By Invoice
There are three Force Account bid items which are paid by invoices received by the crew:
- 6240130 - Uniformed Traffic Control Officer
- 7340224 - Railroad Flagging and Inspection
- 7360020 - Partnering
Uniformed Traffic Control Officer
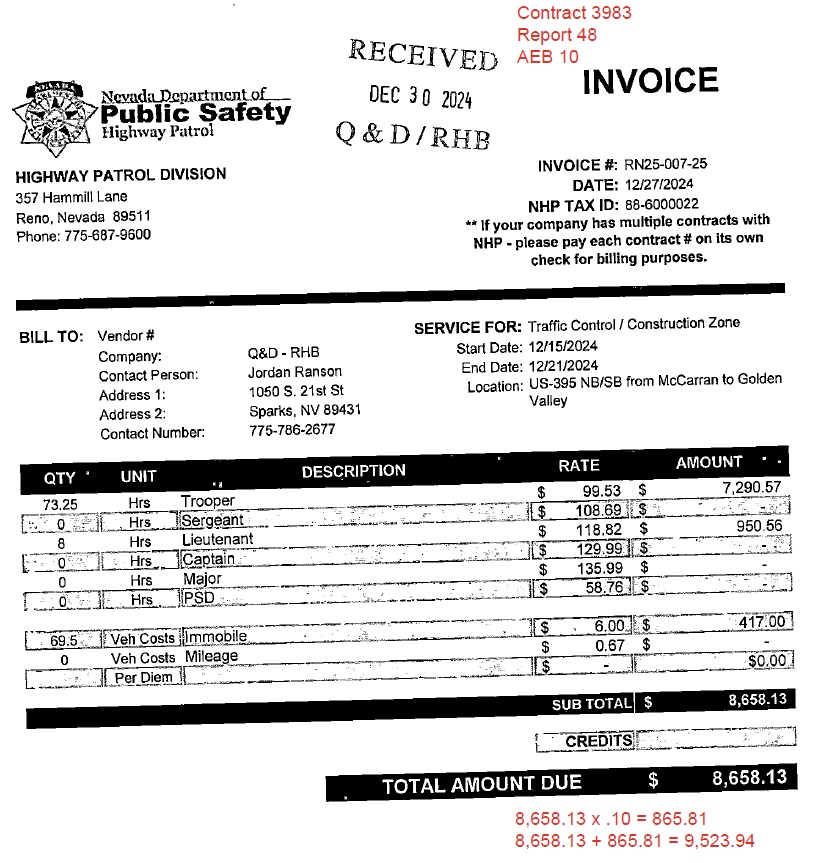
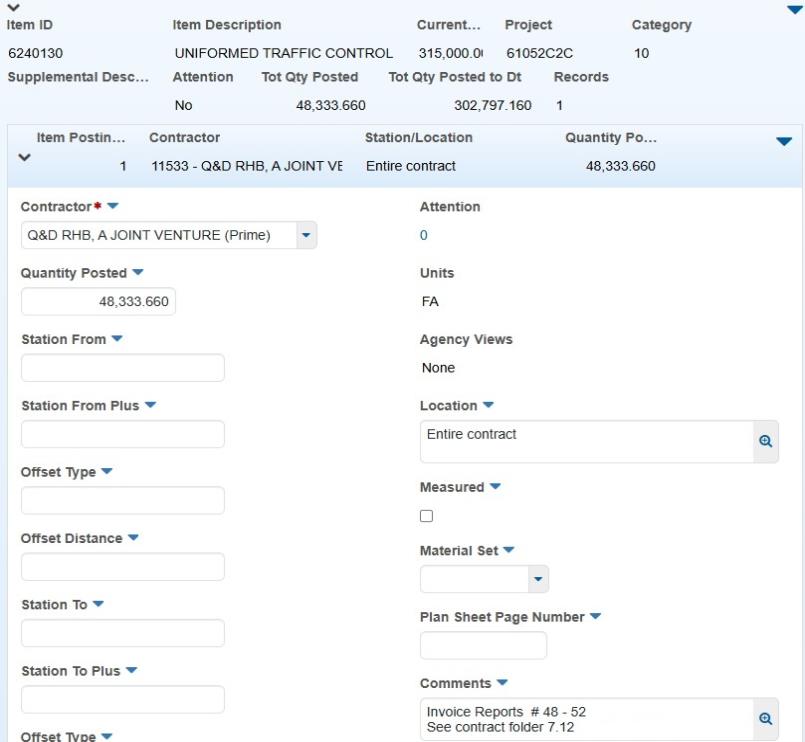
Uniformed Traffic Control Officers are paid using the Nevada Department of Public Safety invoice received from the Prime Contractor.
The Prime Contractor will submit a copy of the Uniformed Traffic Control Officer invoice.
- Enter the Contract number, report number sequence, and category (AEB) on the invoice.
- Enter calculations for a 10 percent markup on the invoice.
- Save the invoice, showing the 10 percent markup (hand written or PDF edits are acceptable), in the appropriate Contract Files\Contract\07 Estimates\7.# Invoices directory.
- Enter the invoice total for all invoices included in payment (including the 10 percent markup) in an AWP DWR posting. Include the report number sequences and reference the appropriate Contract Files directory in the Comments.
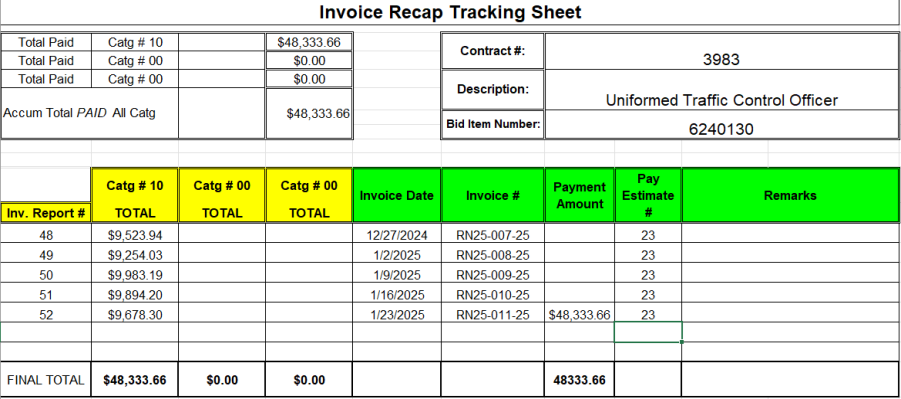
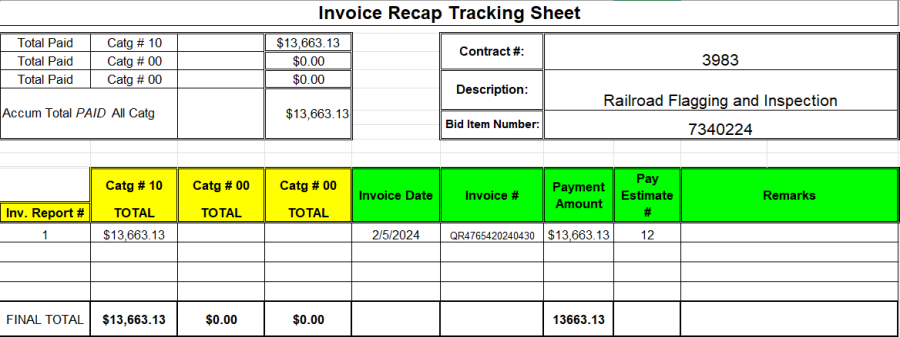
- Enter the totals for each invoice on an Invoice Recap Tracking Sheet. Details on filling out this tracking sheet are found here, Instructions For completing the Invoice Recap Tracking Sheet, in this topic. Save the spreadsheet in the appropriate Contract Files\Contract\07 Estimates\7.# Invoices directory.
Railroad Flagging and Inspection
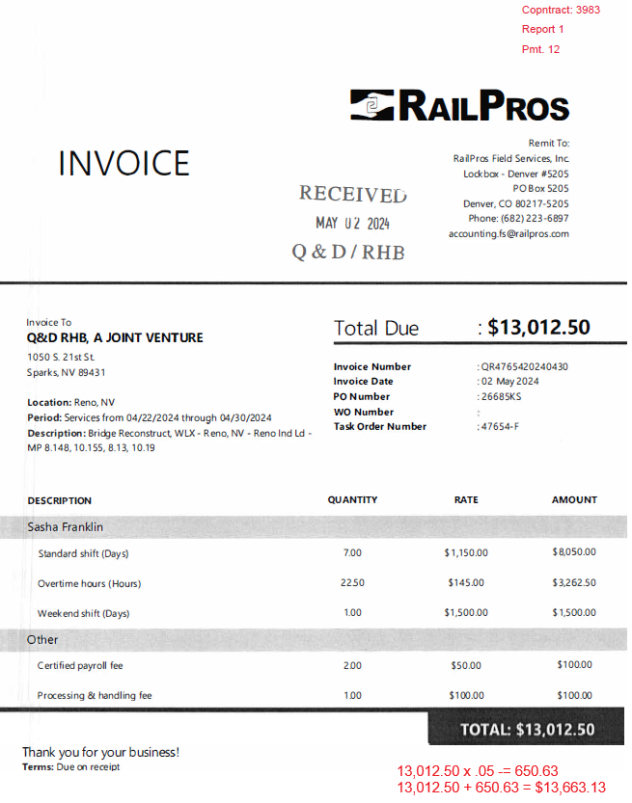
Qualified Railroad Flaggers/Inspectors are paid using the Railroad Flagger/Inspector service provider invoice received from the Prime Contractor.
The Prime Contractor will submit a copy of the Railroad Flagger/Inspector invoice they received from the service provider.
- Enter the Contract number and report number sequence on the invoice.
- Enter calculations for a 5 percent markup on the invoice.
- Save the invoice, showing the 5 percent markup (hand written or PDF edits are acceptable), in the appropriate Contract Files\Contract\07 Estimates\7.# Invoices directory.
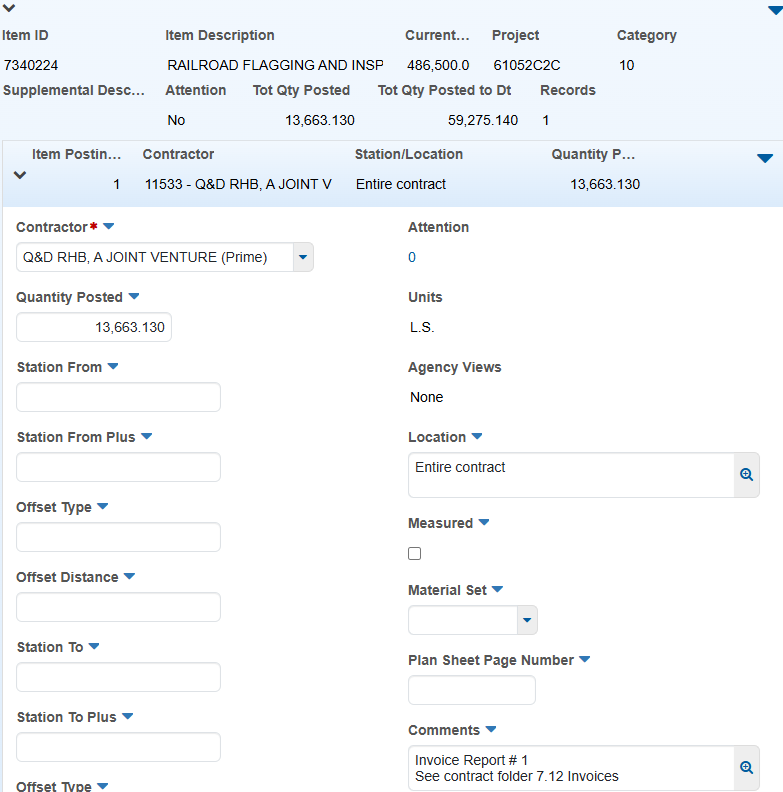
- Enter the invoice totals (including the 5 percent markup) in an AWP DWR posting. Include the report number sequence and reference the appropriate Contract Files directory in the Comments.
- Enter the totals for each invoice on an Invoice Recap Tracking Sheet. Details on filling out this tracking sheet are found here, Instructions For completing the Invoice Recap Tracking Sheet, in this topic. Save the spreadsheet in the appropriate Contract Files\Contract\07 Estimates\7.# Invoices directory.
Partnering
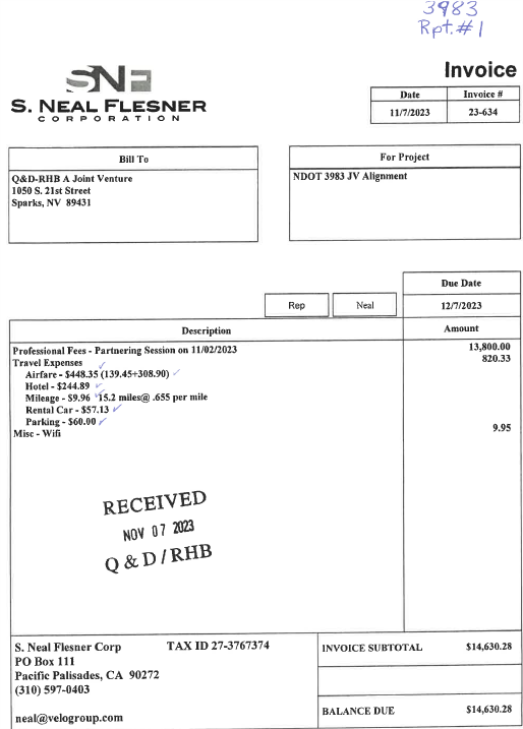
Partnering is paid using the Partnering Invoice received from the Prime Contractor.
The Prime Contractor will submit a copy of the Partnering Invoice received by the service provider.
- Enter the Contract number and report number sequence on the Invoice.
- Save the Invoice (hand written or PDF edits are acceptable) in the appropriate Contract Files\Contract\07 Estimates\7.# Invoices directory.
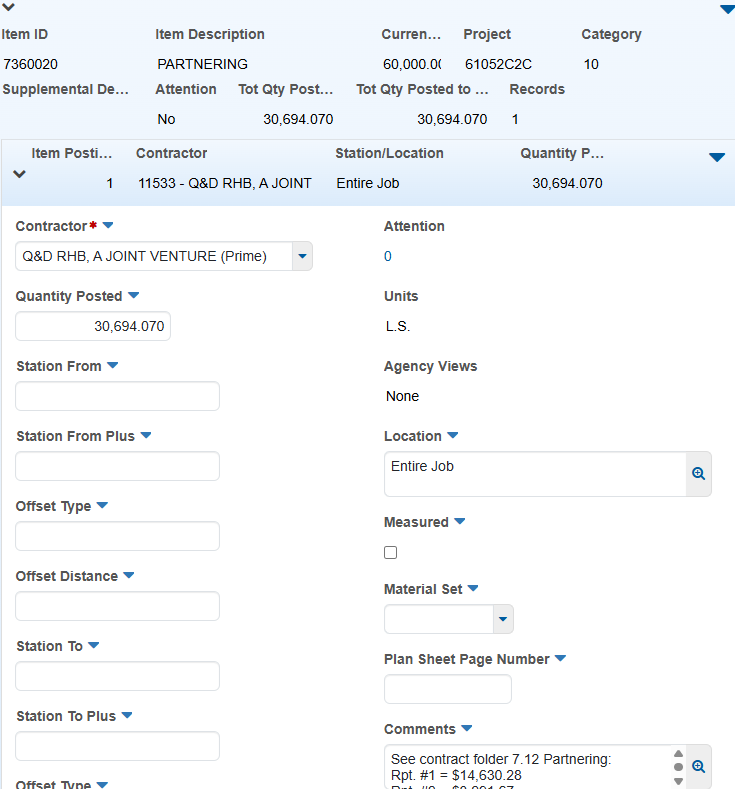
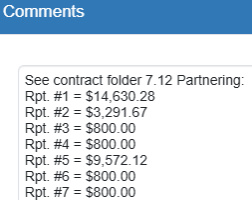
- Enter invoice totals in an AWP DWR posting. Include the report number sequence and reference the appropriate Contract Files directory in the Comments.
- Enter the totals for each invoice on an Invoice Recap Tracking Sheet. Details on filling out this tracking sheet are found here, Instructions For completing the Invoice Recap Tracking Sheet, in this topic. Save the spreadsheet in the appropriate Contract Files\Contract\07 Estimates\7.# Invoices directory.
Note: No markup is allowed.
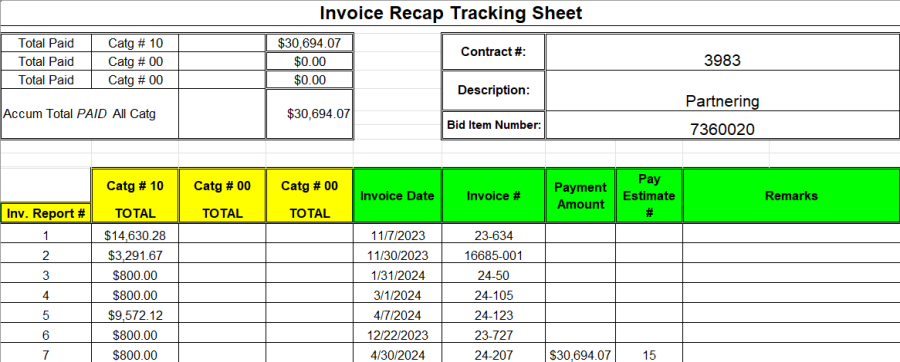
Instructions For Completing the Invoice Recap Tracking Sheet
The Invoice Recap Tracking Sheet is a spreadsheet used to track Uniform Traffic Control Officer invoice, Railroad Flagger and Inspector invoice, and Partnering invoice progress payments. Each bid item will be tracked on a separate spreadsheet. The spreadsheet is used as part of the source documents for payment. The Invoice Recap Tracking Sheet is located in the iNDOT SharePoint NDOT Construction Forms page.
- Record the following information specific to your contract and invoice:
- Contract #
- Description: Bid item description
- Bid item number
- Catg # (Category): Change the Catg. # in the YELLOW box (this will update the Catg. field at the top automatically.) If the contract only has one Catg., change the other Catg. fields in YELLOW to 00. If there are more Categories than what is provided on the sheet, contact Construction Admin Services staff.
- Inv. Report #:
- Catg # TOTAL:
- Invoice Date:
- Invoice #:
- Payment Amount:
- Pay Estimate #:
- Remarks: When applicable
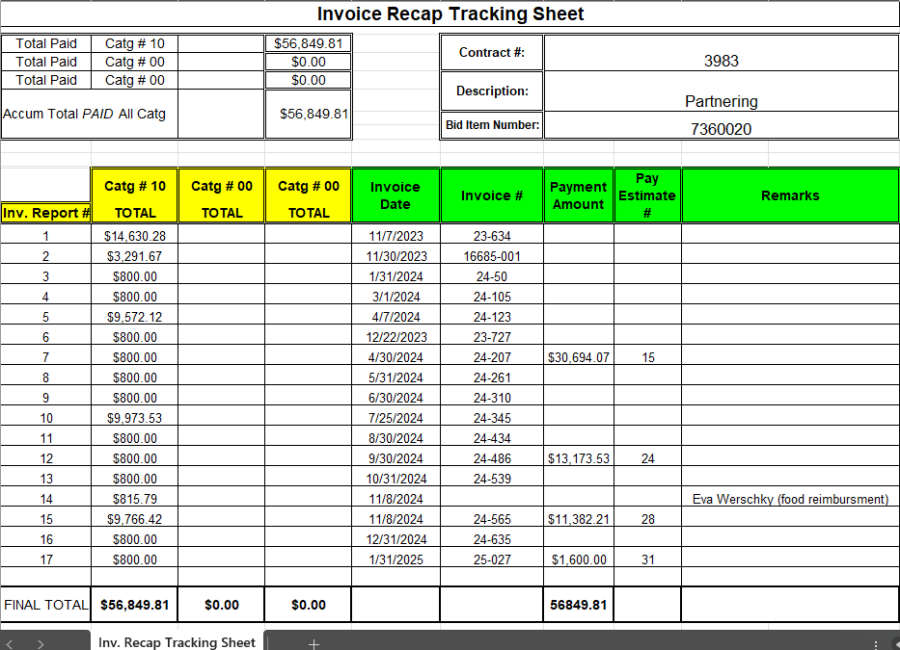
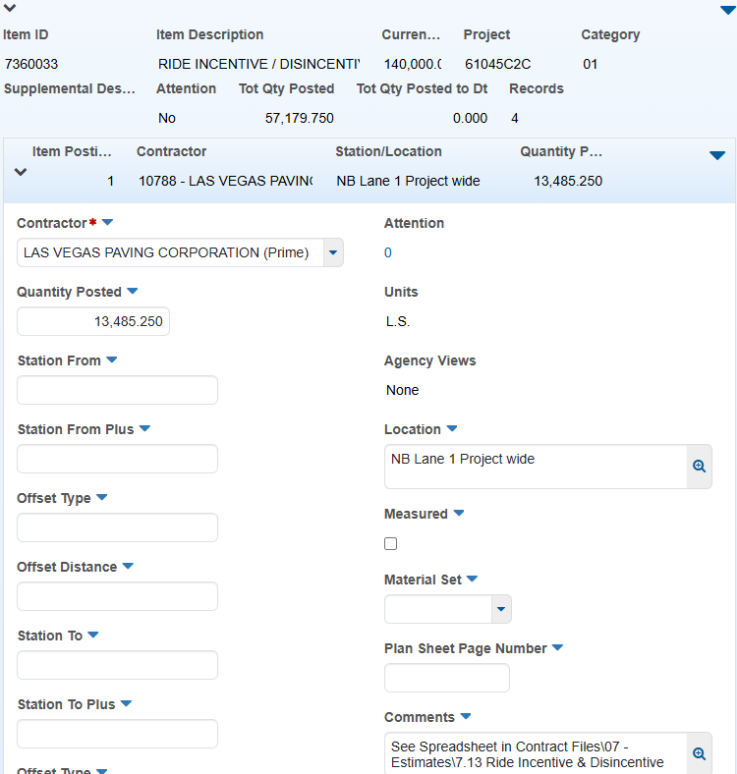
Ride Pay Adjustment
The Ride Pay Adjustment item (7360033 – Ride Incentive/Disincentive) provides a financial incentive for the Contractor to construct an interstate roadway with a ride surface smoother than the specified Mean Roughness Index (MRI). It also establishes a financial disincentive if the ride surface is rougher than the specified MRI, contains any localized roughness exceeding the maximum allowable International Roughness Index (IRI) values, or fails to meet minimum straightedge requirements.
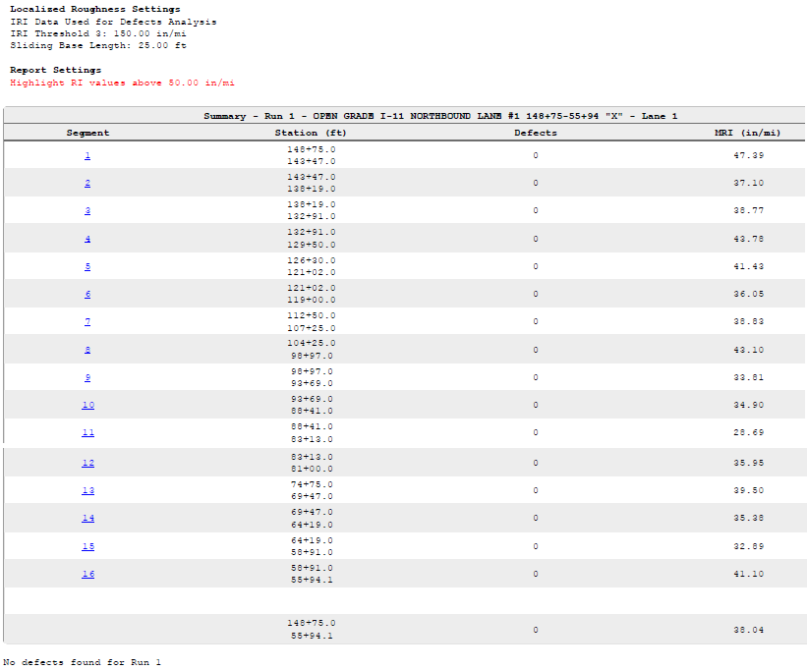
The Prime Contractor will provide a Profile Summary Report on the MRI and IRI values of the pavement (PCCP or PBS Open Grade) riding surface upon completion of the placement of the material. These reports will be saved in the appropriate Contract Files\Contract\07 Estimates\7.# directory as backup documentation. The information provided in the summary report in conjunction with Table 1 for the appropriate incentive/disincentive amounts based on MRI values, which can be found in Section 403 - Plantmix Bituminous Open-Graded Surface, Subsection 403.05.02, Ride Pay Adjustment or Section 409 - Portland Cement Concrete Pavement, Subsection 409.05.02, Ride Pay Adjustment of the Contract's Special Provisions, will be used for Ride Pay Adjustments.
Please contact your District Quality Assurance Inspector and/or the Construction Division Quality Assurance Supervisor for all questions on the Ride Pay Adjustments.
Upon receiving the Profile Summary Report from the Contractor, the following steps must be completed:
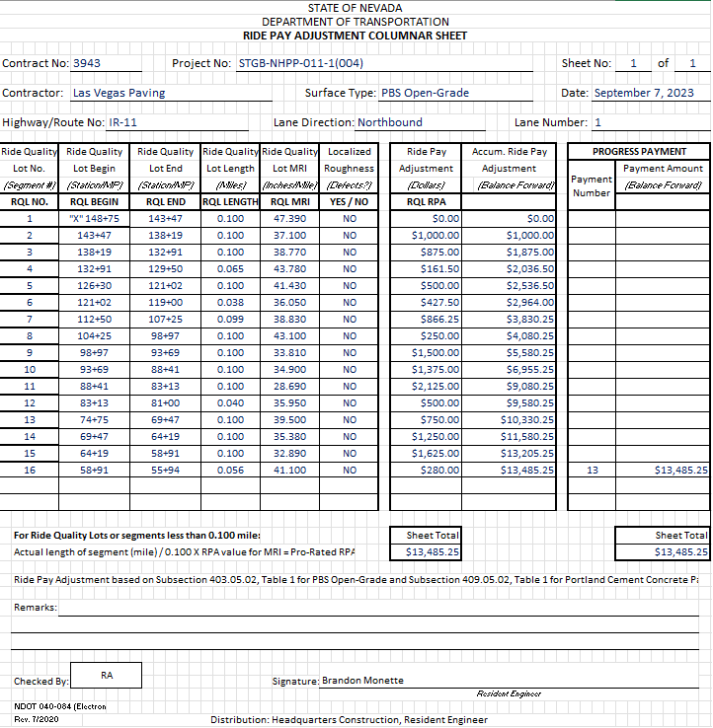
- Obtain the 040-084 Ride Pay Adjustment Columnar Sheet form located in the iNDOT SharePoint NDOT Quality Assurance Forms page. This spreadsheet contains automated calculations based on the Table 1 information found in Section 403 - Plantmix Bituminous Open-Graded Surface, Subsection 403.05.02, Ride Pay Adjustment, or Section 409 - Portland Cement Concrete Pavement, Subsection 409.05.02, Ride Pay Adjustment of the Contract's Special Provisions.
- Use the data provided in the Profile Summary Report to fill out the Ride Pay Adjustment Columnar Sheet spreadsheet. This spreadsheet includes directions (see the Instruction for Use tab) for completing the form. This form must include the following:
- Payment Estimate number where payment occurred.
- Initials of the person checking the form.
- Resident Engineer's signature.
- Save the completed 040-084 Ride Pay Adjustment Columnar Sheet to the appropriate Contract Files\Contract\07 Estimates\7.# directory.
- Create a DWR to document the Ride Pay Adjustment based on the Payment Total from the Ride Pay Adjustment Columnar Sheet. Reference the Contract Files location of the Ride Pay Adjustment Columnar Sheet in the posting Comments.
Profile Summary Report Example
Percent Within Limits (PWL)
The Percent Within Limits (PWL) specification is included on all contracts containing 445,000 SQYD or greater of Type 2 or Type 2C plantmix bituminous surface and a minimum of 4 travel lanes. Depending on the ability of the Contractor to produce a consistent mix which is within specification, the Progress Payment for item, 7360030 - PWL Incentive/Disincentive, provides a financial incentive or disincentive to the Contractor.
PWL uses a statistical analysis to determine the consistency and accuracy of a given lot of the plantmix bituminous surface. The statistical analysis is based upon the asphalt content, in-place density, and aggregate gradation (1/2 inch for Type 2C or 3/8 inch for Type 2, No. 4, No. 10, and No. 200). The information pertaining to the PWL specifications can be found in Subsection 401.02.02, (Plantmix Bituminous Pavements) Composition of Mixtures and 402.05.02 (Plantmix Bituminous Pavements) Plantmix Progress Payment Adjustment, of the contract's Special Provisions.
Please contact your District Quality Assurance Inspector and/or the Construction Division Quality Assurance Supervisor for all questions on Percent Within Limits (PWL). The Quality Assurance Section can also, upon request, provide training for PWL.
Note: The Contractor must decide on record at the beginning of contract, during the pre-construction meeting, whether or not to enact the use of an independent lab to run tests based off of the Nevada Test Method, T344 - Method of Test For Bituminous Mixture Test Result Verification and Dispute Resolution.
Prior to the production of (Type 2 or Type 2C) plantmix bituminous surface, the following must be completed:
- Obtain the most current PWL calculation sheet (PWL Version 10 - (12-2023)) from the Quality Assurance Documents - PWL folder in SharePoint.
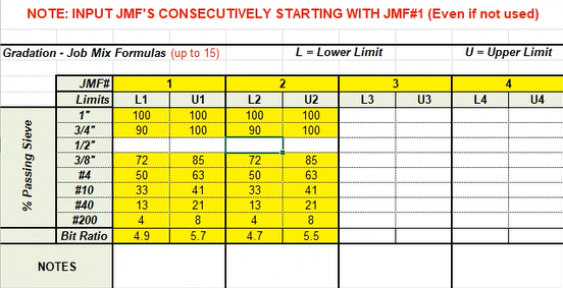
- JMF tab:
- Fill out the required information using the approved JMF documentation.
- Data Entry tab:
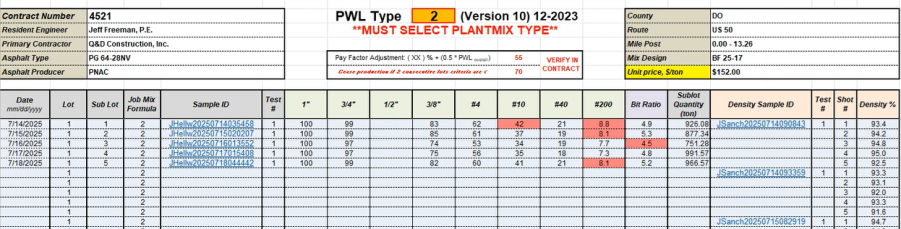
- Fill out the required header information (Contract Number, Resident Engineer, County, etc.). The Unit price, $/ton, is the contract bid price for the Type 2 or Type 2C plantmix bituminous surface.
- Assign lot numbers and corresponding sub-lot to the applicable Sample Records Agency View tests based upon the criteria established in Subsection 402.05.02 of the Contract's Special Provisions.
- As the required Sample Record Agency View tests are completed, input the applicable data using the rounding convention used in the Agency View test.
- Reports tab:
- Review the Pay Factor values and respond accordingly.
- Enter the payment estimate number where the PWL payment will be included.
- Enter the payment amount.
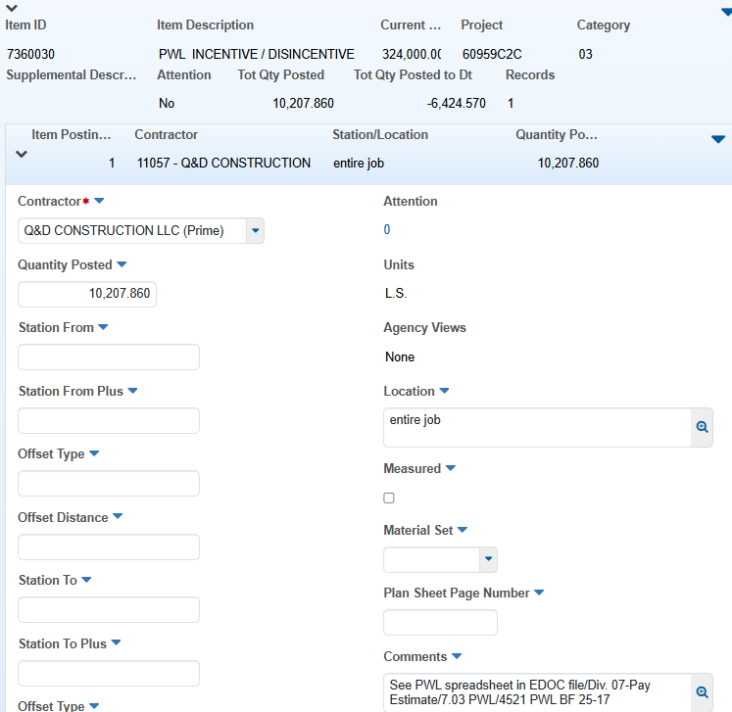
- Create a DWR to document the PWL payment based on the value in either the Bonus or Deduct columns. Reference the Contract Files location of the PWL calculation sheet in the posting Comments

Note: Prior to making the bi-weekly payment, check with the Construction Division’s Quality Assurance Section to ensure the correct Progress Pay Adjustment (PPA) is being used. The Construction Division’s Admin Services Section will not approve the bi-weekly payment without consent from the Quality Assurance Section.