Contract Closeout
This topic provided guidance on the following:
- Contract Closeout Overview
- Contract Closeout Tasks
- Closeout Documents
- Closeout Change Order
- Contract Pickup Memo
- EDOC Crew Checklist for Field Closeout
- District Acceptance Letter
- Final Payroll Letter
- AWP STSR Summary Report
- As-Built Plans and Shop Drawings
- Pit/Property Owner Release
- Materials Deposit Usage Report
- Contractor Past Performance Rating (CPPR)
- Closeout Helpful Tips
- Preparation for the Final Contract Pickup
- Items Required Prior to Contract Pickup
- Items to Complete for Force Account
- Items to Complete for Force Account Items Paid By an Invoice
- Items Required on the Last Scale Ticket for the Day
- Items to Check on the Record of Delivery Sheets
- Items to Check on the Bill of Ladings
- Items to Check on the Asphalt Plant Record
- Verifying Sufficient B/Ls to Cover Production
- Item to Check on Letters of Authorization
- Items to Check on Payment Adjustment LD for Asphalt
- Items to Check on Payment Adjustment LD for Liquid and Emulsified Asphalt
Contract Closeout Overview
Contract Closeout verifies the completion of all the required documents throughout the contract life-cycle to ensure fulfillment of all state and federal requirements (23CFR 635.123). The guidelines and documentation requirements, detailed in this topic, apply to Design-Bid-Build contracts.
Timely contract closeout is crucial to the following:
- Release of the Contractor’s retention and bonds allowing the Contractor to pursue future projects.
- It limits the Department’s exposure to potential Contractor issues or claims.
- Ensuring the availability and accuracy of contract documents.
- Increasing Department efficiency by freeing up critical resources.
- Meeting federal end date and related funding obligations.
Closeout begins when a contract is awarded and continues throughout construction by adhering to the following guidelines:
- Proper contract setup per the Contract Start Up topic in this Manual.
- Saving contract source documents to the appropriate EDOC Contract Files directory.
- Follow the AWP STSR Summary report:
- Ensure there are adequate Materials Division samples and tests for quantities placed.
- Ensure there are adequate field samples and tests for quantities placed.
- Certificates of Compliance are submitted to the Materials Division, Lab Services section, when received, via AWP Cert Sample Records.
- Review item quantities for accuracy and mark as completed. Refer to the AWP Construction User Guide, Contract Items topic for details.
- Review payment quantities with the Contractor bi-weekly.
- Update the As-Built plans as the contract progresses.
- Request a mid-point audit from Construction Admin Section staff.
Note: Use the NDOT Business Intelligence (BI) Report, Item Posting Tracking, to aid in tracking item posting quantities. Contact the Construction Admin Services staff for details on this BI report.
Note: A Contract Closeout Helpful Hints section is included at the end of this topic.
Contract Closeout Tasks
The following is guidance for the Resident Engineer and Office Manager on the tasks required to closeout construction contracts. All documents mentioned in the closeout workflow are detailed in the Closeout Documents Section in this topic. Refer to the AWP Construction User Guide, Field Closeout topic for details.
- Crew Office completes the AWP Semi-Final Payment Estimate.
- Resident Engineer adds the closeout change order, balances all completed items, and enters detailed explanations for any balanced item that is +/- $50,000. This change order is left in Draft status and the Resident Engineer contacts Construction Admin staff that it is ready for their review.
- Resident Engineer completes the Contract Pickup Memo and the EDOC Crew Checklist for the Final Pickup & Review. Email them both to the Construction Admin Services section at Const.Admin@dot.nv.gov.
- Construction Admin Services staff work with the Resident Engineer and Office Manager to schedule a date to copy the required contract files. Refer to the Contract Start Up, Contract files topic for details on these files.
- The crew will give Construction Admin Services staff edit access to the contract's Contract Files SharePoint directory, so the contract files can be copied to a Construction Division network location. These files are transferred to the Records Division (after the final payment has been processed) where they will be placed on the records retention document management system.
- The records in the index spreadsheet need to match the divisions (the directory and sub-directory names). It is acceptable to have non-sequential sub-directory numbers in the case that a sub-directory was not needed and was deleted. Do not include empty sub-directories.
- Any original documents that cannot be scanned and saved to the Contract Files directories.
- Construction Admin Services staff will complete an Item Posting Tracking BI Report noting DWR corrections to be addressed. This BI report will be sent to the Office Manager, so they can make the required corrections.
- General Tab: Weather, Temperature, Remarks Type or Remarks
- Equipment Tab and Personnel Tab: Number, Hours or Comments (Description and Name)
- Postings Tab: Stationing/Location, Offsets, Line Designation or Comments
- In the Note for DWR with the quantity error , provide details on the specific error and the following information from the correcting DWR: Item number and Description, Stationing/Location, Inspector, and the details of the correction that was applied.
- In the Posting comments for the correcting DWR, reference the following information from the DWR where the error occurred: DWR Date, Inspector, Item Number and Description, Stationing/Location and the details on the specific error and provide details on the correction applied.
- When the Resident Engineer determines the contract is substantially complete, they will request an on-site review from the District Engineer.
- After completion of the on-site review, if the District Engineer finds the work in compliance, they will send the District Acceptance Letter to the Contractor and the Construction Division.
- Complete a Guardrail Survey with the ArcGIS Field Maps Application when applicable.
- Send an email to GuardrailDL@dot.nv.gov and Cc Const.Admin@dot.nv.gov when guardrail surveys have been completed.
- The following items MUST be submitted before Construction Admin Services staff can begin their final payment process:
- Final Payroll Letter
- Final signed STSR Summary report
- As-Built Plans
- Pit Release (if applicable)
- Material Deposit Usage Report (if applicable)
- Email indicating Guardrail Survey has been completed using the GIS Field Maps Application (if applicable)
- Contractor Past Performance Rating (CPPR)
- When all the required documents have been approved and accepted by the appropriate Division, Construction Admin Services staff will facilitate the closeout process and final payment.
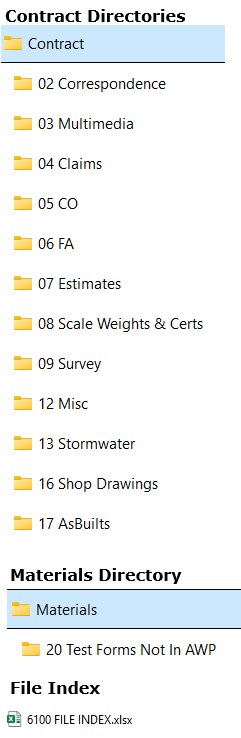
Directories & File Index Required at Job Pickup
Note: During the Contract Closeout process, DWR Notes may be used to correct information such as stationing, offsets, location, and comments, and must include specific details of the correction(s).
Non-Quantity Error in a DWR.
When a non-quantity error is made in a DWR in the below Tabs/Fields and the DWR has been included in a Payment Estimate, create a DWR Note in the DWR with specific details of the correction for the error.
Note:
Quantity Error in a DWR.
When a quantity error (only) is made in a DWR and it has been included in a Payment Estimate, a new DWR must be created to correct the quantity.
Use the DWR Notes to cross-reference both DWRs.
The Maintenance and Asset Management Division is maintaining a statewide guardrail inventory. The construction crew is required to use the ArcGIS Field Maps mobile application to complete all guardrail surveys. Contact GuardrailDL@dot.nv.gov to request access, obtain setup instructions, and for questions regarding the this mobile application.
Note: Construction Admin Services staff will review all the contract source documentation to ensure it was completed per the requirements detailed in this manual.
Closeout Documents
The following section provides information and guidance to the construction crew on required closeout documents. All closeout forms mentioned in this section are found on the NDOT Website Construction Forms page.
Closeout Change Order
The AWP closeout change order reconciles (balances) the quantities of all items in a contract. It includes detailed justification explanations for all items with overruns/underruns greater than $50,000/-$50,000. This change order is prepared by the Resident Engineer after the Semi-Final Payment Estimate is approved. Refer to the AWP Construction User Guide, Adding the Contract Closeout Change Order topic for details. When all the explanations are completed, the Resident Engineer will send an email to the Construction Admin Services section at Const.Admin@dot.nv.gov letting them know the closeout change order is ready for their review. Construction Admin Services staff will review the explanations and complete the change order.
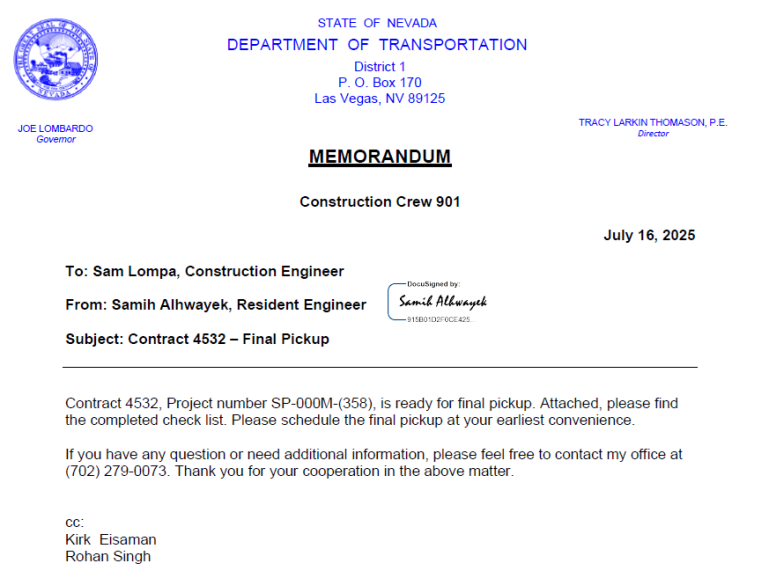
Contract Pickup Memo
The Contract Pickup Memo is the required document to initiate a contract pickup. If there are any questions, contact the Construction Division.
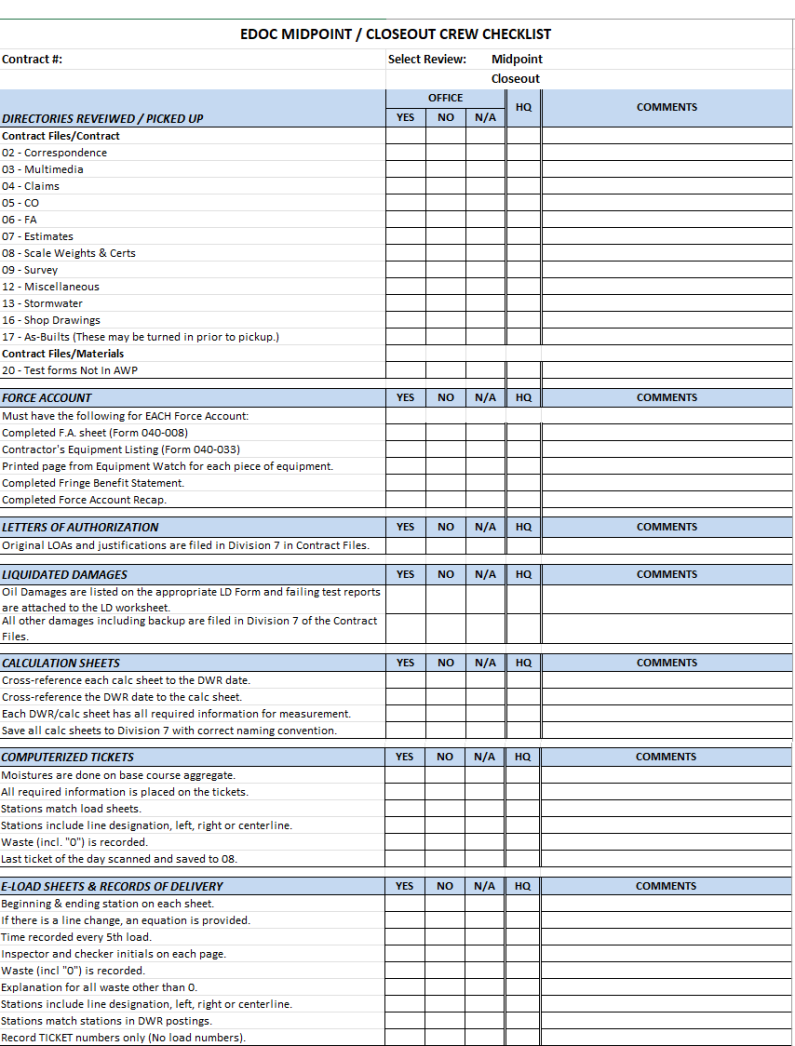
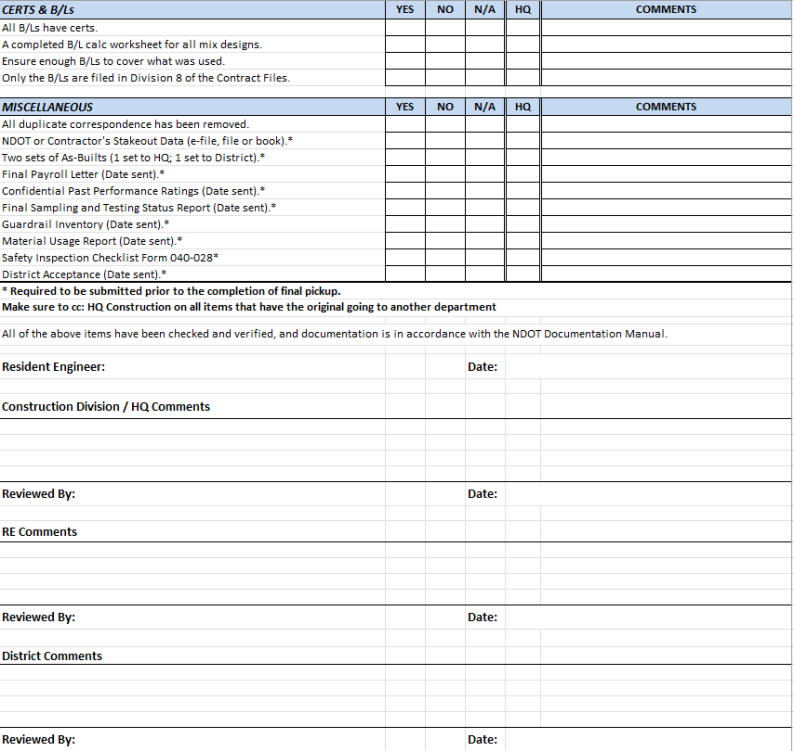
EDOC Crew Checklist for Field Closeout
A completed EDOC Midpoint / Closeout Crew Checklist spreadsheet is required to accompany the Contract Pickup Memo.
- Office Manager will check all the appropriate boxes. Check the “Yes” box when each item is verified as being complete in accordance with this Manual. If the item is not applicable, they must check the N/A box.
- Resident Engineer will sign and date (Page 2 of the Checklist) after all items have been verified by the Office Manager, and documentation is in accordance with this Manual.
- Construction Admin Services Section staff will complete their final closeout audit and resend the checklist through DocuSign to the Resident Engineer and District Engineer for final comments, signatures, and dates.
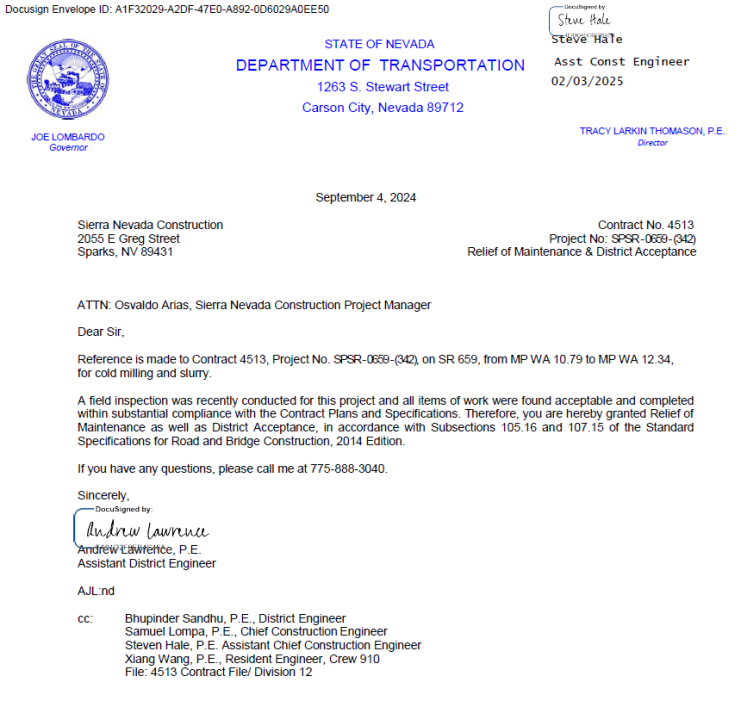
District Acceptance Letter
The District Acceptance Letter is the notification to the Contractor that the items of work were found acceptable and completed in substantial compliance with the Contract Plans and Specifications. This letter, in most cases, includes the Release of Maintenance.
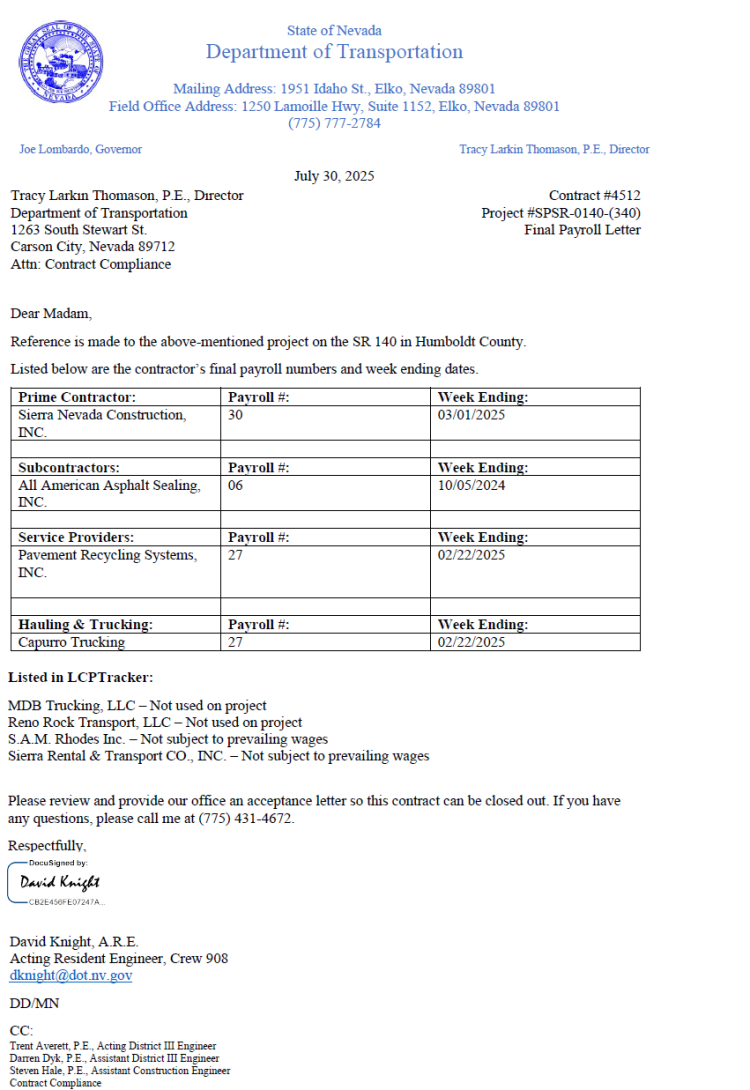
Final Payroll Letter
The Final Payroll Letter is a list of final payroll numbers for the Contractor and all Subcontractors, including the last payroll number and week ending date. The Resident Engineer emails this letter directly to HQ Contract Compliance at
ContractComplianceProjects@dot.nv.gov with a copy to Construction Admin Services staff at Const.Admin@dot.nv.gov. This letter initiates the Contract Compliance Clearance.
AWP STSR Summary Report
The AWP STSR Summary report will be used to document material agency view tests which are deficient in meeting the minimum required sampling and testing. This report is used for the Sampling and Testing Status Report (STSR) reconciliation closeout process and is the document used by the Materials Division, Lab Services staff to sign off on Materials lab clearance. Refer to the Field Testing Guide, Part 4 - AWP User Guides, SAMPLING AND TESTING STATUS REPORT (STSR), Preparation for STSR Job Closeout, and R.E. Reconciliation Processes For STSR Job Closeout sections for details.
Steps to Complete the Final STSR Summary Report
- Resident Engineer (RE) creates the closeout change order, updates as appropriate, and notifies Construction Admin Services staff.
- Construction Admin Services staff reviews and approves the closeout change order.
- Construction Admin Services staff sends an e-mail to the RE and Construction IA staff letting them know the closeout change order has been approved.
- The construction crew completes the STSR Reconciliation process to address insufficient testing. When the insufficiencies have been addressed, the construction crew will email a copy of the STSR Summary report to the Construction IA staff (Staff 1, Sup 3 and Manager 1 positions) letting them know the report is ready for their review.
- Once the Construction IA staff completes their review, they send the STSR Summary report to the Materials Division, Lab Services staff requesting them to review the report for missing tests. This review also includes a check on the contract's material certifications.
- The Lab Services staff will complete their review of the STSR Summary report and material certifications and send an email to Construction IA staff acknowledging the report is accurate and the appropriate material certifications are completed.
- When there are issues with the STSR Summary report or materials certifications, the Construction IA staff will request the construction crew staff to work directly with the Lab Services staff on addressing the issues.
- The Construction IA staff sends the final STSR Summary report via DocuSign for the appropriate signatures.
As-Built Plans and Shop Drawings
As-Built plans are an official record of the project at the time of construction completion. As-Built plans are required for each contract. They are completed electronically in PDF format (ONLY). They can be submitted prior to final job pickup. The crew will send one copy to the Construction Division and one copy to the District Engineer.
Save a PDF file of the original contract plans and special provisions. The PDF files are found in the MasterWorks application in the Bidding Documents area. These files are to be modified to show all additions, deletions, and other changes made throughout construction. Diagram any physical changes (e.g., pipe, guardrail, fence, electrical items, typical section changes, Bill of Material, Structure list, etc.). Accurate As-Built drawings are important for project operation, maintenance, and future modifications, particularly for work completed underground. These modifications are also reviewed when designing future projects.
It is important to submit the As-Built plans properly to ensure accurate record of the drawings. Ensure ALL pages are accounted for in the “Index of Sheets” before submitting As-Built plans.
The following are formatting guidelines for As-Built plans:
- All colors, except for black, can be used for making changes.
- If sheets are omitted, or there’s a break in the numbering sequence, it needs to be noted on the “Index of Sheets”.
- If sheets are added, they need to be in numerical order and noted on the “Index of Sheets”.
- If there are additional sheets sent without a specified sheet number, assign a sheet number in the same series of numbers of the work the plan sheet represents and insert it (e.g., profile, landscape, lighting, etc.). Revise the Index of Sheets accordingly. (This does not apply to a supplemental or revision – see below).
- If a supplemental or revision sheet is added, REMOVE & REPLACE the original sheet. The revised sheet will show the changes.
- If there are no field changes to the plans, write No Field Changes on the title sheet inside the front cover.
- If changes were made, the working As-Built plans shall show correct grade, elevations, cross-section, or alignment of roadway, earthwork, structures or utilities on the appropriate plan sheet.
- Any changes due to change orders need to be noted on the affected plan sheets, with the change order number referenced.
- When Shop Drawings change any part of the original plans, they need to be incorporated into the As-Built plans.
Pit/Property Owner Release
A property owner must submit a Pit/Property Owner Release letter to the Resident Engineer in the case when aggregates or borrow are obtained from a private property. This letter must indicate the property owner is satisfied with the condition the property was left in at the end of construction and releases NDOT from any further liability. The Resident Engineer will send the original letter to Construction Admin Services.
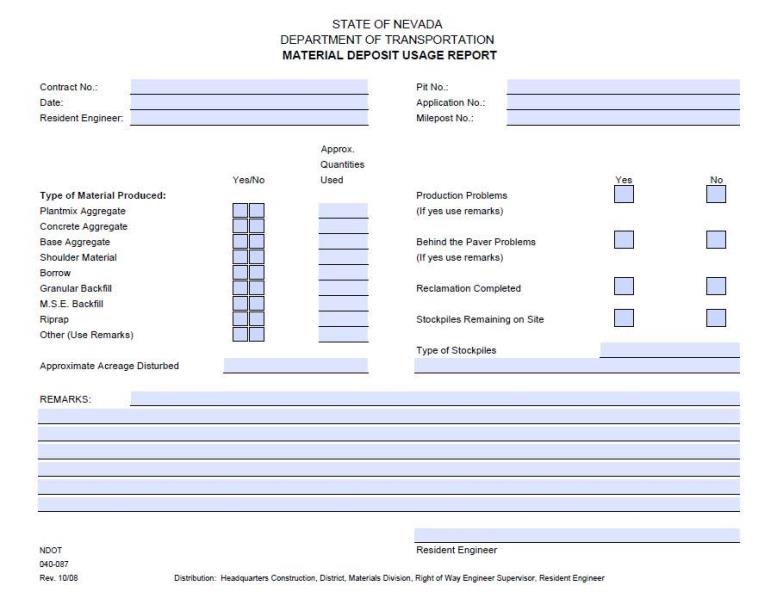
Materials Deposit Usage Report
The Material Deposit Usage Report (Form No. 040-087) will be completed by the Resident Engineer and distributed according to the distribution list at the bottom of the form at the close of each project. The Material Deposit Usage Report is ONLY required for state pits. Completely fill out all information.
Contractor Past Performance Rating (CPPR)
The CPPR is a useful tool during execution of contracts to address any shortcomings by the Contractor that need to be addressed. If the Contractor is struggling to properly execute the contract and work, the Contractor should be put on notice that if they do not rectify the situation, it could lead to a poor rating. For example, complete an interim rating and share with the Contractor what their potential rating will look like if corrective action is not taken.
The Resident Engineer will use the DocuSign template, Const Prime Contractor Past Performance Rating, to properly address the distribution (Resident Engineer, ADE, ACE and Contractor) of the rating. The intent of the template is to ensure the rating is distributed to the appropriate Divisions as well as documenting receipt of completion for contract closeout.
The Contractor can request a review of the rating by the District Engineer. If this should happen, Construction Admin Services staff will forward the rating to the District Engineer for the review. If a review is not requested, Construction Admin Services staff will forward the rating to Administrative Services Division as required.
This report is provided to the Director by Administrative Services Division and is utilized in the evaluation of prequalifications for bidding Department contracts greater than $250,000.
Use the following guidelines for filling out this form:
- Construction Engineering $ to Date: This information is located in the, RE Budget Information - AWP report found in the AWP Power BI App.
- Total # of Change Orders: The number of change orders, excluding those that are in a “DELETED” status and the Administrative Types 25 through 35.
- Total Change Order ($): Exclude the change order totals from the Administrative Types 25 through 35.
- Award Amount ($): The Awarded Price from the Contract Record document found in MasterWorks.
- Final Payment Amount ($): This information is located in the, RE Budget Information - AWP report found in the AWP Power BI App.

Closeout Helpful Tips
Preparation for the Final Contract Pickup
- Crew Office completes the Semi-Final Payment Estimate per the AWP Construction User Guide, Field Closeout topic.
- Review EDOC Contract Files and Materials & Testing Files for accuracy of content and formatting.
- Resident Engineer will send the Contract Pickup Memo and a completed EDOC Crew Checklist to the appropriate Construction personnel.
Items Required Prior to Contract Pickup
- The EDOC Contract Files directories with Index spreadsheet located on the crew's SharePoint or OneDrive location.
- All mix designs, JMF, shop drawings, Contract Compliance documents are filed in the appropriate EDOC Contract Files directories.
- One set of As-Built Plans (take the other set to District).
- Make sure the Calculation Sheets are saved in the appropriate EDOC Contract Files.
Items to Complete for Force Account
- The following documents must be included with the force account file:
- Force Account sheet(s) (Forms 040-008A, 040-008B, or 040-008C)
- Fringe Benefit Statement
- Force Account Equipment Listing (Form 040-033)
- Force Account recap (one for each AEB (category))
- Extended Invoices (original or copy) and/or affidavit (original)
- Save all Force Account documents in the appropriate Contract Files\06 FA directory.
Items to Complete for Force Account Items Paid By an Invoice
- DO NOT complete a Force Account spreadsheet form for these items.
- Add the following information directly on the invoice received:
- Contract number and category (AEB)
- Calculations for the appropriate markup
- Enter the totals for each invoice on an Invoice Recap Tracking Sheet
- Save all Force Account documents in the appropriate Contract Files\06 FA directory.
Items Required on the Last Scale Ticket for the Day
- Date and Type of material.
- Pit information.
- Contract and category number.
- Ticket total must be checked, initialed, and circled.
- Stations match the load book and the plant report for the appropriate day.
- Waste must be explained and deducted from the accumulative (ticket) total.
- Waste is recorded and circled in Red, including '0 waste'.
- Total placed must be circled.
- Resident Engineer’s signature, not initials.
- Checker’s initials
- Optimum/actual moistures are shown for base course aggregate and calculations are done if required.
Items to Check on the Record of Delivery Sheets
- Item No., Item, Plan Qty, and the Sig. Fig. are complete.
- Verify date is complete.
- Truck and trailer number.
- Bill of Lading number or control number. If a control number is used, make sure it is noted in the Remarks column.
- Tons delivered matches the B/L. On Emulsified (diluted), make sure the tons delivered are shown as raw tons on the Record of Delivery.
- Every load is initialed.
Items to Check on the Bill of Ladings
- Contract number, delivery date and Inspector’s initials is written in the right-hand corner of the ticket.
- Weights have been checked and initialed.
- Tons delivered matches what is entered on the e-load sheet (Record of Delivery).
- If the B/L for Emulsified (diluted) comes to the job diluted, make sure the B/L states either 60/40 mix or it shows water and oil weights separately.
- All calculations are checked and initialed.
- The B/L is filed in the Contract Files\Contract\08 Scale Weights directory.
Items to Check on the Asphalt Plant Record
- Item No., Item, and the Sig. Fig. are complete.
- Sample number is listed and matches the Field No. on the Transmittal for Asphalt Sample (Form No. 020-016).
- Complete date matches the Date Sampled on the Transmittal for Asphalt Sample (Form No. 020-016).
- Time has PM or AM listed with the time.
- Every load is initialed.
Verifying Sufficient B/Ls to Cover Production
- Obtain the mix design(s) used.
- Take the percentages on the mix design for the asphalt and mineral filler.
- Enter the oil%, mineral filler %, and RAP% in the worksheet (obtained from SharePoint) to find out how much asphalt and mineral filler was used, as illustrated in the Plantmix and Recycled Surface Items topic in this Manual. Calculations will be based on the total mix. Do not deduct waste.
- Compare the quantity delivered to the used and see if there is enough B/Ls to cover. If there are not enough B/Ls collected, the Resident Engineer must contact the Contractor to see if more B/Ls can be submitted. Make sure the new B/Ls are not duplicates and are in the correct time frame as the paving operation. If no more B/Ls can be collected, then contact the Construction Division to see what the next step will be.
- The total delivered on the Liquid and Emulsified Asphalt will be compared to the total on the e-load sheet (Record of Payment). Verify if there are enough B/Ls to cover what has been used. If there are not enough B/Ls to cover what was used and if no more B/Ls can be collected, then a deduction by means of an AWP DWR posting stating, “there was not enough B/Ls to cover what was used” is required. Make sure to take the total raw tons from the e-load sheet (Record of Delivery) and multiply by the appropriate manufacture recommended dilution factor.
- Gallon meter records and/or weigh-back tickets are required to calculate the app rate used. Verify the weights on the weigh-back tickets are applied to the correct date.
- When using the total B/L, make sure the tons do not exceed the max that can be paid.
- When reading the gallon meter, a temperature correction factor must be used. Check the factor by using the graph in the Liquid and Emulsified Asphalt Items topic in this Manual.
- Ensure the category numbers are correct.
- Station to station does not necessarily equal length. Length must be measured or calculated.
- Width must be measured or calculated (“Varies” is NOT acceptable).
- Inspector’s initials are required.
Item to Check on Letters of Authorization
- The original LOA backup documents and signed copies of letters are scanned into the appropriate Contract Files\07 Estimates directory.
Items to Check on Contract Adjustment LD for Asphalt
- Obtain the e-load sheet (Record of Delivery), the Plant Record, the scale tickets, the Liquidated Damage e-form obtained from SharePoint, and the failing test reports from the Materials Lab.
- Compare the failing test report to the plant record to match the field sample number and the date the sample was taken.
- Make sure the Lab Test #, Date Sampled, Sample #, and Demerits compare to the Liquidated Damage spreadsheet. (Print form from SharePoint).
- Compare the demerits on the Liquidated Damage spreadsheet to the demerits shown in the Silver Book to assure the deduction per ton on the spreadsheet is correct.
- Calculate how much asphalt was used on the days that had failing asphalt. The percent of asphalt is based off the mix design.
- If there was more than one sample taken on a particular day, take the asphalt used and divide by the number of samples taken to get the tonnage each sample represents, whether the sample failed or passed. This will be the quantity used on the Liquidated Damage spreadsheet under Tons.
- Make sure the Liquidated Damages spreadsheet is complete and the calculations are correct.
- Save the Liquidated Damages spreadsheet with all the backup test reports from the Materials Lab in the appropriate Contract Files\Contract\07 Estimates directory.
- Calculate how much asphalt was used on the days that had failing asphalt. The percent of asphalt is based off the mix design.
- If there was more than one sample taken on a particular day, take the asphalt used and divide by the number of samples taken to get the tonnage each sample represents, whether the sample failed or passed. This will be the quantity used on the Liquidated Damage spreadsheet under Tons.
- Make sure the Liquidated Damages spreadsheet is complete and the calculations are correct.
- Save the Liquidated Damages spreadsheet with all the backup test reports from the Materials Lab in the appropriate Contract Files\Contract 07 Estimates directory.
Items to Check on Contract Adjustment LD for Liquid and Emulsified Asphalt
- Obtain the Liquidated Asphalt e-load sheet, the failing test reports from the Materials Lab, and the Liquidated Damage spreadsheet.
- Compare the Lab Test #, Date Sampled, Refinery #, Truck #, Trailer #, and demerits to the Liquidated Damage spreadsheet.
- Compare the demerits on the Liquidated Damage spreadsheet to the demerits shown the Silver Book to ensure the deduction per ton on the Liquidated Damage spreadsheet is correct.
- Check the tons the liquidated damaged is based on to what was used of the load. Remember emulsified asphalt is based on diluted tons.
- Make sure the Liquidated Damages spreadsheet is complete and the calculations are correct.
- Save the Liquidated Damages spreadsheet with all the backup test reports from the Materials Lab in the Contract Files\Contracts 07 Estimates directory.